heather.masson
Living Off-Grid in a Truck: Essential Tips and Tricks
Living off-grid in a truck offers the ultimate blend of freedom, adventure, and independence. But how do you transition from a conventional lifestyle to one where your vehicle becomes your home, office, and shelter? For many, living in a truck conjures up images of simplicity and minimalism. However, there’s more to this lifestyle than meets the eye. Whether seeking a temporary escape from the rat race or a permanent off-grid lifestyle, proper knowledge and preparations can make all the difference. This guide dives into essential tips and tricks for living comfortably and sustainably off-grid in your truck.
The Significance of Truck-Based Off-Grid Living
Why has truck-based off-grid living gained traction in recent years? This lifestyle isn’t just about adventure; it’s about self-reliance, minimalism, and mastering the art of living with less. In an age where urban chaos and high living costs can be overwhelming, the idea of ditching conventional living for a simpler, more mobile setup is undeniably appealing. For those yearning to escape the grid, it’s not just about “surviving” but truly thriving with the freedom to roam while staying resource-efficient.
The beauty of truck-based off-grid living lies in the balance between convenience and autonomy. You’re no longer tethered to utility bills, high rent, or the rat race of city life. Instead, you’re embracing mobility, efficiency, and the natural world as your backyard.
But why does this matter so much today? Here’s why:
- Financial Freedom: No more monthly mortgage payments or utility bills. With your truck as your dwelling, you’re reducing costs significantly.
- Sustainability: Living off-grid in a truck teaches you to use only what’s necessary. You’ll learn to minimize waste, conserve energy, and live harmoniously with nature.
- Adaptability: The ability to move whenever and wherever you want offers unparalleled flexibility. Your home can travel with you to remote places, away from urban stressors.
- Personal Growth: This lifestyle encourages problem-solving, adaptability, and resilience. From figuring out how to power your devices to managing your water supply, each challenge becomes a stepping stone for personal growth.
- Connection with Nature: Waking up to the sound of the wind and spending your nights under the stars makes you more connected with the natural world, something that’s easily lost in a traditional living setup.
Critical Essentials for Off-Grid Truck Living: What You Need to Survive and Thrive
Venturing into off-grid living in a truck demands more than just enthusiasm for freedom. You’ll need to equip your vehicle with the right tools, gear, and resources to navigate this mobile lifestyle comfortably. From energy sources to water storage, each essential item plays a pivotal role in making life on the road sustainable and hassle-free. Explain the fundamental necessities and why they matter in your off-grid setup.
Must-Have Items for Off-Grid Truck Living
There’s a fine line between being prepared and overpacking when living off-grid in a truck. To make life on the road easier, here’s a table outlining the essentials you’ll need, broken down by category:
| Category | Essential Item | Purpose/Importance |
| Energy | Solar Panels | Provides a renewable energy source for charging devices and running small appliances. |
| Portable Battery Bank | Stores power generated by solar panels for use during the night or on cloudy days. | |
| Water | Collapsible Water Containers | Easy storage and transportation of water, vital for drinking, cooking, and cleaning. |
| Water Filtration System | Ensures access to clean drinking water from natural sources or campsite spigots. | |
| Cooking | Portable Stove or Propane Grill | Compact cooking setup for preparing meals while on the road. |
| Cooking Utensils | Lightweight, multi-purpose utensils that save space without sacrificing functionality. | |
| Shelter & Comfort | Insulated Sleeping Bag or Sleeping Pad | Provides warmth and comfort during cold nights, especially when camped in remote areas. |
| Roof or Truck Bed Tent | Maximizes sleeping space, offering a safe, dry place to sleep away from the elements. | |
| Navigation | GPS Device or Offline Maps | Helps you stay on track, especially in areas with no phone signal or internet access. |
| Two-Way Radio | Useful for communication in remote areas without cellular coverage. |
Why These Essentials Matter
Solar panels and portable batteries ensure you’re not left powerless, while water storage and filtration systems give you access to clean water—an absolute must when living off the grid. Cooking gear keeps your meal prep simple yet effective, and portable shelters like truck tents provide a comfortable place to rest after long days on the road.
Mastering Resource Management: Water, Energy, and Waste
One of the biggest challenges when living off-grid in a truck is managing your essential resources—water, energy, and waste. Without the safety net of city utilities, you’ll need to become highly resourceful and efficient in handling these necessities. Effective resource management isn’t just about convenience—it’s about survival and ensuring your journey remains sustainable in the long run.
- Water Management: Water is the lifeblood of off-grid living, and when your truck becomes your home, it’s critical to manage every drop. With limited space, you won’t have the luxury of endless water supplies. Here’s what you need to keep in mind:
-
- Water Storage: Compact, collapsible containers are perfect for storing and transporting water without consuming too much space in your truck. Aim to have enough storage for at least 3-4 days’ worth of water, especially if you’re venturing into remote areas.
- Water Collection: Portable rain collection systems, in addition to carrying water, are also considered. These systems can be easily set up when parked in one place for an extended period, allowing you to tap into nature’s resources.
- Filtration: Whether it’s from a stream, river, or a campground spigot, water filtration is essential. Invest in a high-quality portable filter to ensure you always have safe drinking water, no matter where you are.
- Energy Management: Living off-grid means energy sources become more limited and precious. Efficient energy management is critical to keeping your devices charged and small appliances running smoothly:
-
- Solar Power: Solar panels are the go-to solution for off-grid adventurers. They’re reliable, sustainable, and perfect for harnessing energy in sunny locations. Pair them with portable battery banks to store energy when the sun isn’t shining.
- Energy Efficiency: Make sure that every device you carry is energy-efficient. From LED lights to low-energy appliances, every watt saved matters.
- Waste Management: When you’re far from traditional utilities, dealing with human and material waste becomes critical to off-grid living. Handling waste responsibly ensures your setup remains clean and your impact on the environment is minimal:
-
- Biodegradable Products: Opt for biodegradable soaps and cleaning products wherever possible.
- Composting Toilet: Consider investing to manage human waste in an eco-friendly way. These toilets are self-contained and minimize water use, making them ideal for mobile living.
- Trash Management: Keep sturdy garbage bags on hand and dispose of waste regularly in designated areas. Stay organized to avoid waste piling up inside your vehicle.
Step-by-Step Guide to Setting Up Your Truck for Off-Grid Living
Turning your truck into a fully functional off-grid haven doesn’t happen overnight. It requires careful planning, intelligent modifications, and a solid understanding of utilizing every inch of space. Here’s a step-by-step process to help you get started, ensuring your truck is efficient and comfortable for long-term off-grid living.
Step 1: Evaluate Your Space: Before making any modifications, assess the space in your truck. Depending on your vehicle’s size (pickup, van, or flatbed truck), your layout and available room will vary. Measure the interior to determine how much space you can allocate for sleeping, storage, and essential systems like cooking and water.
- Tip: Prioritize multi-functional spaces. A bed that doubles as a seating area or storage under sleeping platforms will maximize your usable area.
Step 2: Install Your Power Source: Solar power is the go-to choice for most truck dwellers due to its sustainability and portability. Here’s how to get started:
- Choose Your Solar Panels: Depending on your power needs, select the appropriate size and wattage for your panels.
- Mount the Panels: Ensure they’re positioned to optimize sun exposure.
- Connect to a Battery Bank: Use a charge controller to connect the panels to a portable battery bank, allowing you to store energy for later use.
- Tip: Consider adding a power inverter to convert DC to AC power, which allows you to run appliances and charge multiple devices.
Step 3: Optimize Water Storage and Filtration: Water is a non-negotiable for off-grid living, so a solid system is crucial. Here’s how to set up a reliable water supply:
- Install Collapsible Water Containers: These containers are ideal for compact storage and can be tucked away when unused. Ensure you have enough to store at least a week’s worth of water.
- Set Up a Water Filtration System: A portable water filter is used to purify water from natural sources or campsite spigots.
- Tip: Attach a small faucet to your water container to make accessing water for cooking, drinking, and cleaning easier.
Step 4: Build Your Sleeping Quarters: The sleeping area is the heart of your truck’s setup. Comfort and practicality are essential, especially when living in tight quarters. Here’s what to do:
- Create a Platform Bed: A raised platform bed allows you to store essentials underneath, maximizing space. Ensure the platform is sturdy and comfortable, with proper insulation to keep warm during colder nights.
- Invest in Quality Bedding: A suitable sleeping bag or insulated mattress pad will improve your comfort level.
- Tip: Consider installing blackout curtains or window covers to increase privacy and relax the truck.
Step 5: Equip Your Truck with a Portable Kitchen: Eating well while living off-grid is possible with a portable kitchen setup. Here’s how to get started:
- Use a Portable Stove or Grill: These are lightweight and perfect for off-grid cooking. Make sure you have a safe, designated area for use.
- Organize Cooking Utensils: Keep cooking utensils, pots, and pans in compact containers to save space.
- Tip: Install a small foldable table or use a tailgate area for food prep and meal times.
Step 6: Add the Finishing Touches: Customize your truck for comfort and efficiency:
- Storage Solutions: Use bins, hanging organizers, or magnetic strips to keep everything tidy and accessible.
- Lighting: Install LED lights powered by your solar setup to provide bright, energy-efficient lighting.
- Tip: Keep a toolbox handy with essential repair and maintenance items for on-the-road fixes.
Frequently Asked Questions About Off-Grid Living in a Truck
Is it legal to live in a truck off-grid?
Yes, but it depends on where you park. The legality of living in a truck off-grid varies by location. However, urban areas typically restrict overnight parking, so it’s important to research local regulations before setting up camp. Many truck dwellers opt for stealth camping in cities, parking overnight in designated spots or near truck stops to avoid fines.
How do I generate power while living in a truck?
The optimal way to power an off-grid truck is by using solar panels. With solar energy, you can capture and store the sun’s energy in portable battery banks for future use. This setup is ideal for charging devices, powering lights, and even running small appliances. Some truck dwellers also use portable generators or rely on their vehicle’s alternator to generate power while driving. Choosing energy-efficient appliances and devices can stretch your power supply further.
How do I manage water while off-grid?
Managing water is essential for anyone living off-grid, especially in a mobile setup. Collapsible water containers are excellent for storing water, and many off-grid truck residents use portable water filtration systems to purify water from natural sources. Conserving water when cooking, cleaning, and showering reduces waste. Some people use solar or camping showers that heat water through solar energy for personal hygiene.
How do I stay warm during colder months?
Insulating your truck is crucial for surviving cold weather. Many truck dwellers use thermal insulation for windows, walls, and floors to keep the cold out and heat in. Portable propane heaters are another option, though proper ventilation is essential when using fuel-burning devices inside a confined space.
How do I handle waste when living off-grid?
Waste management is a significant consideration when living off-grid. For human waste, many people invest in portable or composting toilets that require minimal water and are eco-friendly. Trash should be packed and disposed of responsibly in designated areas or dumpsters, especially when camping in remote areas. Reducing waste using biodegradable products and limiting disposable packaging also helps minimize your environmental impact.
How do I stay connected without reliable internet access?
Many off-grid truck residents use mobile hotspots to create their own Wi-Fi network or rely on satellite internet for more remote locations. For those who need to stay online regularly, planning your travel around areas with better connectivity can help, or you can visit coffee shops, libraries, or other public places with Wi-Fi.
What’s the most challenging part about living off-grid in a truck?
The challenges of truck life vary from person to person, but some common hurdles include resource management, isolation, and vehicle maintenance. Living off-grid requires being mindful of water, power, and food supplies, which can be time-consuming. The lack of traditional social structures and consistent internet access can also make some people feel isolated. Finally, keeping your truck in good working condition is crucial, as mechanical issues can be a severe inconvenience on the road.
Wrapping It Up: Key Takeaways and Final Thoughts
Living off-grid in a truck offers unparalleled freedom, adventure, and self-sufficiency but requires thoughtful preparation and adaptability. Every aspect of your mobile life needs to be efficiently planned, from creating a well-organized space to harnessing the sun’s power and ensuring access to clean water.
Key takeaways from this journey include:
- Maximize space efficiency: Smart use of limited space, through multi-functional furniture and organized storage, is critical for comfortable living.
- Power and water are lifelines: Solar power and proper water storage/filtration are non-negotiable elements for successful off-grid living.
- Comfort and insulation matter: Staying warm in colder months and having a cozy sleeping setup makes a difference regarding long-term truck dwellings.
- Legal and logistical considerations: Knowing where to park legally and ensuring access to basic amenities like waste disposal and the internet is essential for seamless truck living.
In summary, living off-grid in a truck offers a blend of freedom and challenges, with the potential to craft a lifestyle that is sustainable, mobile, and uniquely tailored to your preferences. Whether you want to reduce your environmental impact, travel full-time, or embrace minimalism, this path allows incredible flexibility and self-reliance. With the right tools, mindset, and preparation, off-grid truck living can be an enriching and liberating experience.
Earth Battery Voltage: Everything You Need to Know
Ever wonder if the ground beneath your feet could be a power source? It sounds almost too futuristic, but the concept of Earth battery voltage has been around for quite some time. It harnesses the Earth’s natural electric potential to generate energy. Unlike traditional batteries that rely on chemicals to store power, Earth batteries tap into the Earth’s natural conductivity, using a simple setup of metal electrodes and moist soil.
But why should you care about Earth battery voltage? As the world leans toward more sustainable and renewable energy solutions, this old-school technology has started to gain renewed attention. It offers a potential alternative power source for remote locations and low-energy devices and opens up intriguing possibilities for those looking to reduce their carbon footprint. Whether you’re a curious eco-enthusiast or simply exploring the world of off-grid energy solutions, Earth battery voltage is an innovative concept that could become a game changer in the future of energy generation.
Understanding Earth Battery Voltage and Its Relevance
So, what makes Earth battery voltage such a compelling subject? To start, the concept is as intriguing as it is practical. The Earth can act as a low-maintenance power source with its naturally occurring electric currents. An Earth battery can generate small amounts of electricity using a pair of dissimilar metals embedded in moist soil. This may sound like something out of a science experiment, but it’s rooted in real-world applications that could revolutionize energy sustainability.

The allure of Earth battery voltage lies in its potential for decentralized, eco-friendly power generation. Imagine having a power source that doesn’t rely on the grid, solar panels, or wind turbines. Instead, you’re tapping into the very ground beneath your feet. While it may not power your home, Earth batteries can serve more minor needs—like powering sensors, low-energy devices, or remote off-grid equipment. This technology is innovative and timely in a world increasingly focused on reducing carbon emissions.
Here’s why the topic of Earth Batteries is crucial:
- Sustainability: Earth batteries rely on the planet’s natural conductivity, eliminating the need for chemical reactions or harmful materials used in conventional batteries.
- Off-grid capabilities: Earth battery technology provides a simple and renewable alternative to power low-energy devices for remote areas or places lacking energy infrastructure.
- Cost-effective: Since the primary “fuel” for an Earth battery is the soil itself, maintenance and operation costs are minimal. Once set up, it can generate power with little to no input.
- Eco-conscious solution: Unlike traditional energy sources that rely on finite resources, Earth battery voltage taps into a renewable and nearly limitless energy source, aligning with sustainability and environmental preservation goals.
How Earth Batteries Work: The Science Behind the Power
Earth battery voltage may sound like magic, but its science is fascinating and straightforward. At its core, an Earth battery utilizes the natural electrical potential difference between two dissimilar metals buried in moist soil. The soil acts as an electrolyte, allowing ions to move between the metals, thus generating electricity. This process is reminiscent of traditional batteries operating without relying on corrosive chemicals. Instead, Earth batteries tap into the naturally occurring electric fields in the ground to create power.
The basic setup involves inserting two electrodes—usually metals with differing electrochemical properties—into the Earth. A typical combination includes copper and zinc rods, where copper acts as the positive electrode (cathode) and zinc as the negative electrode (anode). The soil provides the conductive medium, and its moisture allows ions to flow between the two metals, creating a voltage. The greater the distance between the electrodes and the more conductive the soil, the higher the voltage output.
To further understand how this technology stacks up against other renewable energy solutions, here’s a simple comparison:
| Parameter | Earth Battery | Solar Power | Wind Power |
| Energy Source | Natural Earth conductivity | Sunlight | Wind movement |
| Setup Cost | Low (basic materials like copper and zinc) | High (panels, inverters, batteries) | High (turbines, installation costs) |
| Maintenance | Minimal (once installed, requires little upkeep) | Moderate (panels need occasional cleaning) | High (moving parts require regular service) |
| Power Output | Low (suitable for small devices, sensors) | Moderate to high (can power homes or industries) | Moderate to high (depending on wind speed) |
| Environmental Impact | Very low (no emissions or harmful byproducts) | Low (but manufacturing panels have some impact) | Low (turbine production has a moderate impact) |
| Scalability | Limited (more suited for low-energy needs) | High (can be scaled for homes or businesses) | High (suitable for large-scale projects) |
Advantages of Earth Batteries:
- Low Impact, High Return: The components needed for an Earth battery are inexpensive and easy to source, making it an accessible energy solution for anyone.
- No Emission: Unlike fossil fuels or even some renewable energy sources that require extensive manufacturing, Earth batteries are almost entirely carbon emissions-free.
- Suitable for Remote Areas: Earth batteries require little infrastructure, making them ideal for powering devices in off-grid locations.
Applications of Earth Batteries: Where Can This Technology Be Used?
While Earth battery voltage may still need to be the primary power source for homes or industries, it holds significant potential in specific applications. This technology thrives in low-energy environments where small but reliable power outputs are necessary. From remote locations to educational projects, Earth batteries serve a unique niche that can fill gaps in the renewable energy landscape.
- Remote Sensors and Monitoring Equipment Imagine a forest monitoring system that tracks wildlife or environmental changes. These devices typically require very little energy, making them ideal candidates for Earth batteries. Earth batteries are an excellent fit for long-term, low-maintenance energy solutions because they can be installed virtually anywhere without relying on solar exposure or consistent wind.
- Off-Grid and Survivalist Solutions Self-sufficiency is critical for those living off the grid. Earth batteries provide an alternative energy source for small-scale applications, such as powering LED lights, radios, or small electronics. While they won’t replace more robust off-grid systems like solar panels, Earth batteries can serve as a backup power source or supplement existing renewable energy solutions.
- Educational and Experimental Projects In schools, Earth batteries offer a fantastic hands-on learning tool for teaching the basics of electricity, renewable energy, and sustainability. Students can quickly build and observe the function of an Earth battery with simple materials, giving them insight into how natural energy can be harnessed. This concept bridges the gap between science education and environmental awareness, offering a unique and memorable classroom experience.
- Emergency Power In survival situations or during natural disasters when the primary power grid is down, Earth batteries can provide a small but vital power source. While they won’t charge your phone or run appliances, they could power emergency devices like small radios or flashlights. The simplicity of the setup makes it an attractive option when resources are scarce and conventional power sources are inaccessible.
Powering the Future with Earth Batteries:
- Agricultural Monitoring: Soil moisture sensors or weather stations in remote farming areas can run on Earth batteries, ensuring continuous data collection without human intervention.
- Military Applications: Earth batteries can provide an undetectable, sustainable power source for small devices like communication tools or surveillance systems in challenging terrains or remote outposts.
- Eco-Friendly Landscaping: Earth batteries could power low-energy lighting systems or decorative features in urban gardens or sustainable landscaping without any environmental impact.
Step-by-Step Guide: How to Build Your Earth Battery
Building your own Earth battery might sound like something from a science fiction novel, but it’s a simple, DIY-friendly project requiring minimal materials. If you’re curious about generating power from the ground beneath you, here’s a step-by-step process to get your Earth battery up and running.
Step 1. Gather Your Materials: Before you start, make sure you have the suitable materials on hand. Earth batteries require only a few essential components, most of which are easily accessible:
- Copper rod (cathode)
- Zinc rod (anode)
- Alligator clips or copper wiring
- Multimeter (to measure voltage)
- Moist soil or a small patch of ground
- Container (if you’re not using direct soil)
- Water (optional for extra moisture)
Step 2. Prepare the Soil: The key to an efficient Earth battery is moisture. Dry soil won’t conduct electricity well, so lightly water the area where you plan to insert the electrodes if necessary. If you’re using a container, fill it with soil and moisten it until it feels damp.
Step 3. Insert the Electrodes: Now, place your copper and zinc rods in the soil. Position them a few inches apart to allow the electric potential to form between the two metals. The copper rod will act as the cathode (positive terminal), while the zinc rod will serve as the anode (negative terminal). The distance between them plays a role in the voltage generated—the further apart, the higher the potential difference, although a few inches should suffice for a basic setup.
Step 4. Connect the Wires: Using alligator clips or copper wiring, connect the copper rod to the positive terminal of your multimeter and the zinc rod to the negative terminal.
Step 5. Measure the Voltage: Now comes the exciting part—measuring your Earth battery’s voltage. Please turn on your multimeter and set it to measure DC voltage. A small voltage reading should appear on the screen, typically 0.5 to 1.0 volts. The reading may fluctuate slightly depending on the soil’s moisture content and the distance between the electrodes.
Step 6. Troubleshoot and Optimize: If you’re not seeing a voltage reading or the reading is too low, try these troubleshooting tips:
- Increase the moisture by adding a little more water to the soil.
- Reposition the electrodes to increase the distance between them.
- Different metals can also be used for the electrodes (aluminum can also work).
- Test in different soil types to see which yields the highest voltage.
Step 7. Scale It Up: Once you’ve successfully generated power from your Earth battery, you can experiment with scaling it up. You can create a series of Earth batteries by connecting multiple cells in series (copper to zinc, and so on) to increase the total voltage output. This is a great way to power small devices or explore the potential for off-grid energy solutions.
Step 8. Put It to Use: While a single Earth battery won’t power your home, it can be a learning tool or even provide enough energy to run small devices like LED lights, clocks, or low-energy sensors. The possibilities are endless, and you can integrate Earth battery technology into various low-power projects with some creativity.
Frequently Asked Questions About Earth Battery Voltage
As Earth battery technology gains traction among eco-enthusiasts and DIYers, many question how it works and its potential uses. Here’s a breakdown of the most frequently asked questions to help clarify the concept and its applications. These answers are designed to be clear and unique and avoid repetitive wording from other resources.
What exactly is an Earth battery?
An Earth battery is a simple device that generates electricity by harnessing the Earth’s natural conductivity. It uses two dissimilar metals, copper and zinc, inserted into moist soil. The Earth acts as an electrolyte, allowing ions to move between the metals and generating a small voltage. It’s a natural version of a traditional battery without the need for manufactured chemicals or materials.
How much power can an Earth battery generate?
Earth batteries typically produce low voltage, usually in the range of 0.5 to 1.0 volts per cell. The output depends on several factors, including the distance between the electrodes, the conductivity of the soil, and the moisture content. While it’s not enough to power large appliances, multiple cells can be connected to generate higher voltage for low-energy devices like LEDs, sensors, or small electronic gadgets.
What kind of soil works best for an Earth battery?
Moist, conductive soil works best for Earth batteries. Soil rich in minerals and with adequate moisture will allow ions to flow freely between the electrodes, improving the voltage output. Clay-rich soils or those near water sources tend to perform better than dry, sandy soils. However, you can always add water to increase the moisture content and enhance conductivity.
Can an Earth battery replace traditional power sources?
At this stage, Earth batteries are not designed to replace conventional power sources like solar or wind energy for large-scale electricity needs. Their low output suits small-scale applications, such as powering sensors, environmental monitoring systems, or small lights. Earth batteries are best seen as a supplemental or backup power option rather than a full-on replacement for the grid.
How long do Earth batteries last?
The lifespan of an Earth battery depends on the materials used and the soil conditions. Due to natural corrosion, copper and zinc electrodes tend to degrade slowly over time. Still, with proper care, an Earth battery can function for several months or even years before needing to be replaced. Keeping the soil moist will also extend its life and maintain its power output.
Are Earth batteries environmentally friendly?
They use natural resources—the Earth and metals like copper and zinc—to generate power. Moreover, they don’t produce emissions or require energy-intensive manufacturing processes like traditional batteries.
Can you increase the voltage of an Earth battery?
You can boost the voltage by connecting multiple Earth battery cells in series. This means linking one cell’s copper electrode to the next’s zinc electrode. By doing this, the voltage of each cell adds up, allowing for a higher total voltage output. This method can generate enough power to run slightly larger devices or multiple small gadgets.
What are some real-world uses for Earth batteries?
Earth batteries are handy in areas where traditional energy infrastructure is lacking. They can power small devices such as garden lights, environmental sensors, and other low-energy electronics in remote or off-grid locations. They’re also popular in educational settings, providing a hands-on way to teach electricity and renewable energy concepts. Moreover, they offer an excellent solution for hobbyists and experimenters interested in alternative energy sources.
Conclusion: Key Takeaways and Final Thoughts on Earth Battery Voltage
Earth batteries may not be the most well-known energy solution, but their simplicity, sustainability, and affordability make them a fascinating alternative for small-scale power generation. By harnessing the natural electric potential of the Earth using two dissimilar metals and moist soil as an electrolyte, Earth batteries offer a unique way to generate voltage without relying on conventional or harmful energy sources.
Key Takeaways:
- Earth batteries create voltage between two dissimilar metals (such as copper and zinc) buried in conductive, moist soil.
- These batteries produce low voltage—typically between 0.5 and 1.0 volts—making them suitable for powering small devices, sensors, or environmental monitors.
- While they aren’t a replacement for traditional renewable energy systems like solar or wind, Earth batteries are highly eco-friendly and require minimal maintenance.
- Earth batteries are versatile, finding applications in off-grid living, educational projects, remote sensors, and even emergencies where small, reliable power sources are needed.
In summary, Earth batteries represent an underappreciated piece of renewable energy technology. They provide an accessible, low-cost solution for low-power needs while contributing to sustainability efforts. Although not designed to power homes or large-scale systems, their role in the renewable energy landscape, especially in niche applications, is undeniable. With suitable materials and setup, anyone can explore the power of the Earth beneath their feet, making this a genuinely intriguing energy experiment.
How to Make Papercrete Blocks: A DIY Guide
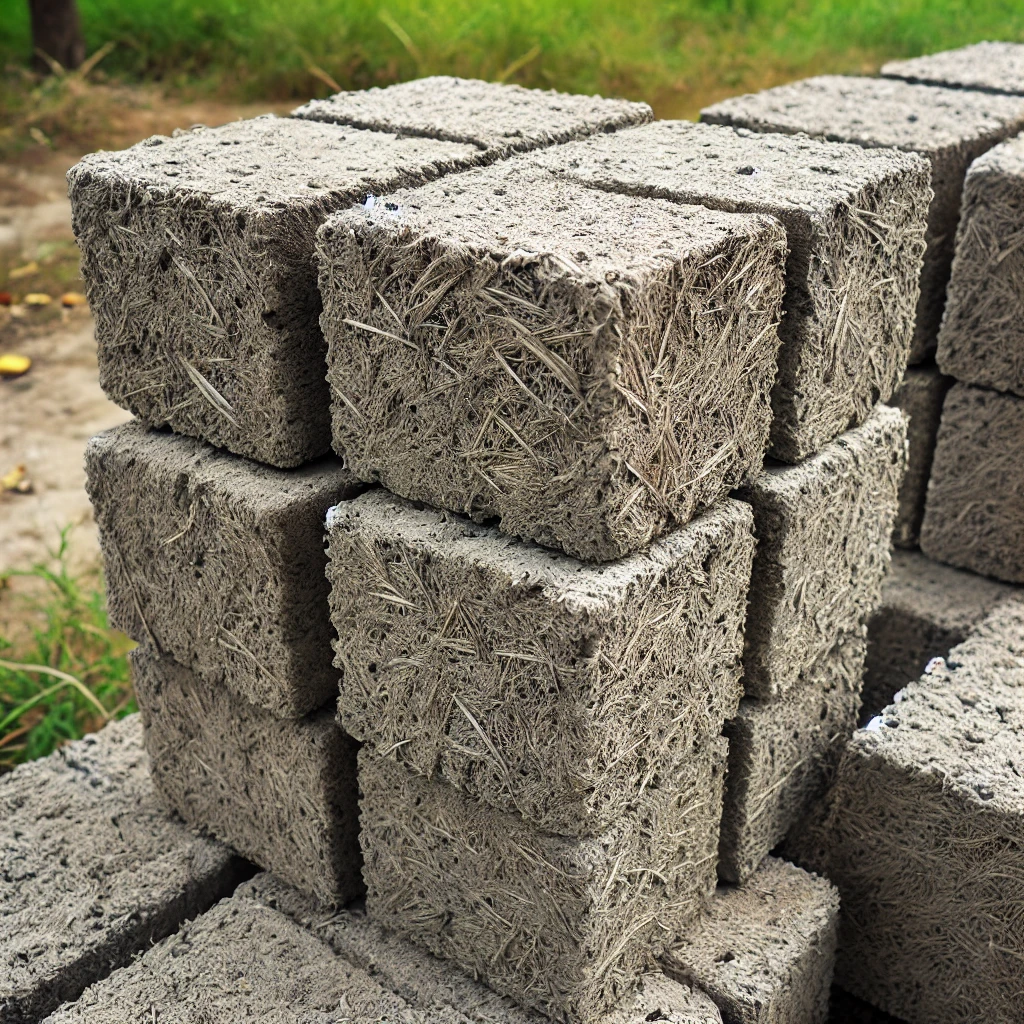
Have you ever considered using waste paper to create robust and sustainable building materials? Papercrete blocks are the perfect solution. Combining recycled paper with cement and water, this eco-friendly material is surprisingly durable, lightweight, and ideal for various DIY construction projects. Whether you’re looking to build garden walls, sheds, or other small structures, making papercrete blocks at home can save you money while reducing waste. In this guide, we’ll walk you through the simple steps of creating these unique blocks, sharing tips, tools, and techniques to ensure your project succeeds.
Why Papercrete Blocks Matter and How They Revolutionize DIY Construction
Papercrete blocks are making waves in the world of DIY enthusiasts, eco-conscious builders, and sustainable architecture advocates. They represent an innovative, resource-efficient alternative to traditional construction materials, offering a blend of durability, affordability, and environmental benefits. If you’re into sustainable living or want a more cost-effective solution for your building projects, papercrete blocks could be your game-changer.
What sets papercrete apart from other materials is its surprising strength-to-weight ratio. It combines waste paper—often destined for landfills—with cement and water to create a versatile, lightweight block. This makes it a greener choice and incredibly easy to work with, especially for first-time builders or DIYers who prefer to take control of their projects. Papercrete blocks are more easily shaped and customized than regular concrete blocks, which are heavy and require more intensive labor.
Here’s why this eco-savvy option should be on your radar:
- Sustainability at Its Core: Papercrete uses recycled paper as a primary component, reducing landfill waste. By diverting paper waste and repurposing it into construction materials, you’re lowering your carbon footprint and contributing to a more circular economy.
- Cost-Effectiveness: Traditional building materials, especially concrete, can rack up costs quickly. Papercrete, by using inexpensive materials, significantly lowers the expense of your project, making it an ideal option for budget-conscious builders.
- Versatility in Design: Whether you want smooth, uniform blocks or more rugged, textured ones, the flexibility of papercrete allows for almost endless possibilities.
- Thermal Insulation: Papercrete is a natural insulator, meaning structures built with these blocks tend to maintain more consistent internal temperatures. This can reduce heating and cooling costs—another bonus for your wallet and the environment.
- Lightweight and Easy to Handle: Papercrete is much lighter than conventional concrete, making it more manageable during construction. This feature reduces the need for heavy machinery or extra hands, making it a go-to material for DIY builders.
The Science Behind Papercrete Blocks: What Makes Them So Effective?
Before creating papercrete blocks hands-on, it’s essential to understand the science behind this eco-friendly material. What gives papercrete its strength, versatility, and insulating properties? The answer lies in its unique composition. Papercrete comprises three primary components: recycled paper, cement, and water.
The Key Components and Their Roles:
| Component | Role in Papercrete | Benefits |
| Recycled Paper | It acts as a fibrous bulk, binding with the cement to add volume and reduce weight. | Utilizes waste paper, reducing landfills and cutting costs. |
| Cement | Provides the necessary binding agent, giving the block its structural integrity. | Adds strength and durability to the mixture. |
| Water | Ensures proper consistency during the mixing process, helping to bind the materials together. | Aids in the even distribution of the cement within the paper fibers. |
These three components work in harmony to create a light and highly versatile material. The fibrous nature of paper fibers helps distribute the cement evenly, ensuring that every part of the block is reinforced without weighing it down. Paper fibers also give the blocks unique insulating properties, making them ideal for energy-efficient buildings.
Why Papercrete Is a Game-Changer
- High Insulation Value: Papercrete has excellent thermal insulation properties thanks to its fibrous core. This makes it a prime material for buildings in regions that experience extreme temperatures. Structures built with papercrete can remain more relaxed in the summer and warmer in the winter, helping to reduce energy consumption.
- Breathability: Paper concrete allows structures to breathe unlike traditional concrete, preventing moisture buildup. This feature is especially beneficial in climates where humidity could otherwise become a problem.
- Ease of Customization: During the mixing process, you can add natural pigments, different textures, or other elements to customize the look and feel of your blocks. This freedom opens up a realm of creative possibilities for DIY builders.
- Fire Resistance: Surprisingly, papercrete is more fire-resistant than expected. Once dried, the paper fibers are so densely compacted that they don’t ignite easily, adding a layer of safety to your building.
- Soundproofing: Another advantage of papercrete is its ability to reduce noise transmission. This is particularly useful for constructing walls in densely populated areas where noise control is a priority.
Step-by-Step Guide to Making Papercrete Blocks
Crafting papercrete is straightforward, but attention to detail is critical to ensuring solid and long-lasting blocks. You’ll need a few essential tools and ingredients, but the most vital ingredient is your enthusiasm for building something eco-friendly and cost-effective.
Materials You’ll Need:
- Recycled Paper – Newspapers, cardboard, or any other scrap paper will do.
- Portland Cement – This acts as the binder that holds the block together.
- Water – Enough to thoroughly saturate the paper and create a slurry.
- Optional Additives – Sand, lime, or clay can be added for extra strength or to adjust the texture of the blocks.
- Mixing Tools – A large container or cement mixer to combine all the materials.
- Block Molds – You can buy or create wooden or metal molds to shape the papercrete blocks.
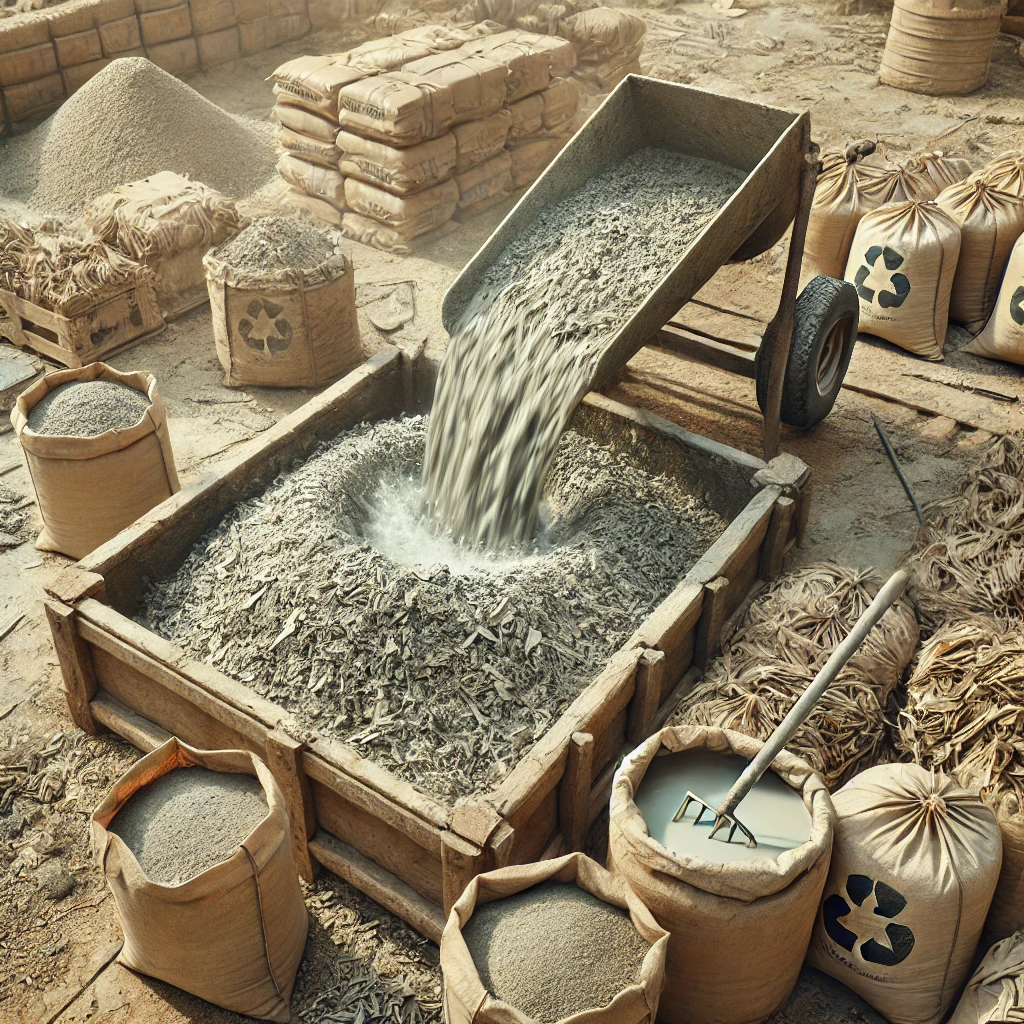
- The Mixing Process:
- Paper Pulp Preparation: Start by soaking your recycled paper in water for 24 hours or more. Once thoroughly soaked, blend the paper into a pulp using a paint mixer or drill attachment. The goal is to get a smooth, consistent pulp without large chunks.
- Mixing Cement: Mix Portland cement with water in an enormous container. The ratio can vary depending on your desired strength, but a good starting point is 1 part cement to 4 parts paper pulp. You can reduce the paper content to make more vital blocks.
- Combining Ingredients: Slowly add the paper pulp to the cement mixture. Thoroughly combine the pulp and cement to ensure the blocks are evenly reinforced. Stir consistently until the mixture has a thick, soupy consistency.
- Optional Additives: Here, you can customize your papercrete. Add sand for extra strength, lime to increase durability, or clay to create a smoother texture. Each additive will change the properties of the finished block, so experiment with small batches first.
- Molding the Blocks: Once your papercrete mixture is ready, pour it into your molds. The more uniform your blocks are, the stronger they’ll be once dried.
- Drying and Curing: Allow the blocks to dry in a cool, shaded area for several days. Papercrete dries slower than traditional concrete, so patience is vital. Once the blocks are dry, let them cure for at least 1 to 2 weeks to achieve maximum strength.
- Tips for Best Results:
- Mix Thoroughly: Make sure there are no clumps of paper in the pulp, as this can weaken the final block.
- Test Small Batches: Try different paper, cement, and additives ratios to find the best mix for your project.
- Proper Curing: Don’t rush the drying process; properly cured papercrete blocks will last longer and provide better insulation.
Pro Tips for Perfecting Your Papercrete Blocks: A Step-by-Step Guide
Now that you’ve mastered the basics of making papercrete blocks let’s dive into some pro tips to elevate the quality of your blocks. These steps will help ensure consistency, durability, and customization for any project you’re working on. From preparation to finishing, follow this guide to get the best results possible.
- Fine-Tuning Your Paper Pulp: A crucial step in the papercrete process is ensuring that your paper pulp is smooth and consistent. Here’s how to get it right:
-
- Pre-Soak Paper Properly: Always soak your paper for at least 24 hours. This will soften it up, making the blending process more accessible and ensuring no large chunks remain.
- Blend in Batches: Avoid overloading your mixer with too much paper at once. Blending in smaller batches will ensure a smoother texture and prevent any parts from remaining unblended.
- Use the Right Paper: Not all papers are created equal. Newspapers, junk mail, and uncoated paper break down quickly, while glossy magazines or coated paper can be more complex to pulp. Stick to the soft, easy-to-pulp types of paper for the best results.
- Perfecting the Cement Mixture: The right balance between cement and paper creates strong, lasting blocks. Here’s how to fine-tune your mix:
-
- Measure Consistently: Always measure your cement and paper pulp by volume for reliable results. A standard ratio is 1 part cement to 4 parts paper pulp, but you can adjust depending on the desired strength. Reducing the paper content will result in more substantial, heavier blocks.
- Mixing Techniques: When combining the paper pulp with cement, use a slow, steady mixing technique. This prevents the pulp from becoming too watery or separating from the cement. A thicker mixture will produce more substantial blocks, so avoid adding excess water.
- Customizing Your Block Strength and Texture: One of the most significant advantages of papercrete is how customizable it is. Experiment with additives to change the texture and strength of your blocks:
-
- Add Sand for Strength: If you want your blocks to be more rigid, add a small amount of sand to the mixture. Start with 1 part sand to 6 parts papercrete mixture. This addition increases the structural integrity without making the block too heavy.
- Incorporate Clay for Smoothness: Add a small portion of clay for a smoother texture, especially if you plan to plaster the blocks. This will make your blocks easier to finish and paint later.
- Pigment for Color: If you’re after aesthetics, adding natural pigments during mixing can give your blocks a unique color. Make sure to add the pigment when mixing the cement so the color disperses evenly.
- Ensuring Even Mold Filling: How you fill your molds will affect your blocks’ final shape and strength. Here are a few pro steps to follow:
-
- Fill in Layers: Instead of dumping the mixture into the mold all at once, fill it in layers. Spread a thin layer, tamp it down with a trowel, and then repeat. This method eliminates air pockets, ensuring your blocks dry evenly and remain structurally sound.
- Use a Vibrating Tool: If you can access a vibrating tool, run it outside the mold to help release trapped air. This will prevent cracks and weak points in the finished product.
- Maximizing Drying and Curing Quality: The drying and curing phase is one of the most critical steps in creating robust and long-lasting papercrete blocks. Follow these tips to maximize the quality:
-
- Slow and Steady Drying: Never rush the drying process. Papercrete dries slowly, especially in humid conditions. Keep the blocks in a cool, shaded area, allowing them to dry naturally for several days. It may take over a week for thicker blocks to dry completely.
- Flip the Blocks: Flip the blocks after 3-4 days to ensure even drying on all sides. This prevents one side from remaining moist for too long, which could weaken the structure.
- Extended Curing for Strength: Curing your blocks for two more weeks will allow the cement to fully harden and reach its maximum strength. This step is essential if you’re building a load-bearing structure.
Frequently Asked Questions About Papercrete Blocks
When working with it, people often have questions about papercrete’s preparation, strength, and usage. This section will cover some of the most commonly asked questions to help you better understand this versatile material.
What Exactly is Papercrete?
Papercrete is an innovative building material that blends recycled paper with a binder (usually Portland cement) and water. The resulting mixture creates a lightweight, highly insulative, and eco-friendly alternative to traditional concrete. Papercrete’s primary appeal lies in its use of discarded paper products, making it a sustainable option for DIY builders and environmentally conscious projects.
How Strong Are Papercrete Blocks Compared to Regular Concrete?
While papercrete offers sufficient strength for many construction purposes, it is less intense than traditional concrete for heavy load-bearing structures. However, papercrete performs exceptionally well for non-load-bearing walls, garden features, and insulation projects. Adding materials like sand or clay can increase the structural integrity of the blocks if needed. Remember that papercrete’s strength varies based on the ratio of paper to cement and any additives used.
How Long Does it Take for Papercrete Blocks to Dry?
The drying time for papercrete depends on the size and thickness of the blocks and the surrounding environmental conditions. Generally, papercrete takes several days to dry, with larger blocks requiring a week or more. Humidity can extend the drying process, so storing your blocks in a well-ventilated, shaded area is essential. After drying, papercrete should be cured for 1-2 weeks to reach its full strength.
Can I Use Papercrete for Load-Bearing Structures?
Although papercrete has many fantastic properties, it is only typically recommended for heavy load-bearing structures with additional reinforcement. For walls and structures that require greater strength, using a mix with a higher ratio of cement or adding rebar can improve durability. If you plan to build a load-bearing wall, consult a structural engineer to ensure the papercrete mix is appropriate for the project.
Is Papercrete Waterproof?
Papercrete is not naturally waterproof, but due to its cement content, it does have some water-resistant properties. However, adding a sealant or waterproofing layer to the finished blocks is essential if your project requires water or moisture exposure. This will prevent degradation over time, especially in exterior applications where the blocks may be exposed to rain or high humidity.
What Are the Best Uses for Papercrete Blocks?
Papercrete is ideal for many projects, mainly where weight and insulation are vital considerations. Some common uses include:
- Non-load-bearing walls in homes or sheds
- Garden beds or retaining walls
- Insulation panels for buildings
- Decorative garden features
- Eco-friendly sculptures and art installations
Its flexibility makes it popular among DIY enthusiasts who want to experiment with sustainable building techniques.
How do I customize the look of papercrete?
Customizing the look of your papercrete blocks is quite simple. You can add natural pigments to the mixture during the blending process to create colored blocks. Alternatively, you can finish the blocks with a plaster or stucco coating to achieve a smooth surface. Adding texture or unique designs to the molds can give the blocks a more creative, personalized appearance.
What are the environmental advantages of using papercrete?
Absolutely! One of the biggest draws of papercrete is its environmental sustainability. By recycling paper waste and reducing the need for traditional concrete, which has a high carbon footprint, papercrete helps reduce landfill waste and energy consumption. It’s an eco-conscious choice for those looking to minimize their environmental impact while building.
Conclusion: Key Takeaways and Final Thoughts
Papercrete blocks offer an eco-friendly, cost-effective solution for many building projects. Using recycled paper combined with cement, you can create lightweight, versatile blocks that work well for non-load-bearing walls, garden structures, and insulation. The benefits of this material extend beyond sustainability—it’s also customizable, easy to work with, and requires minimal resources to produce.
Here are the key takeaways from the process of making and using papercrete:
- Eco-conscious alternative: Papercrete reuses paper waste, reducing landfill contributions while providing a practical building material.
- Customizable strength: The strength of papercrete can be adjusted by altering the mix, adding sand, or incorporating reinforcing materials, making it adaptable for various projects.
- Lightweight and insulative: Due to the paper content, these blocks are lightweight and provide natural insulation, which makes them excellent for energy-efficient homes.
- Longer drying time: Papercrete requires patience, as it takes several days to dry and should be allowed to cure for at least 1-2 weeks to achieve optimal strength.
- Not load-bearing: While vital for specific uses, papercrete is only suited for heavy load-bearing structures with added reinforcement or consultation with a structural engineer.
In conclusion, papercrete represents a creative fusion of sustainability and innovation. Its affordability and ease of use make it accessible for DIY builders and eco-conscious enthusiasts. Proper preparation, drying, and curing techniques will make your papercrete blocks sturdy and ready for various applications, helping you craft unique, environmentally friendly projects.
Stay Cozy Anywhere: Crafting Your DIY Camping Hot Water Heater
Nestled amidst nature’s embrace, the great outdoors beckons with its serene landscapes and untamed beauty. Picture this: the sun setting in a blaze of colors, the crackling of the campfire, and the fragrance of pine lingering in the air. It’s the epitome of tranquility, except for one missing piece – a warm, invigorating shower.
For every avid adventurer, camping is a way of life, an escape from the mundane into a realm of natural wonders. Yet, the absence of modern comforts, particularly a luxurious hot shower, often leaves a yearning for a home’s warmth. Fear not, intrepid explorer! Amidst the simplicity of the wild, there exists a solution born of ingenuity and everyday items—your very own portable hot water heater, transforming your camping experience into a cozy retreat.
This isn’t just about crafting a heating device; it’s about infusing a touch of comfort into the ruggedness of the wild. In this guide, we embark on a journey to unlock the secrets of constructing your DIY camping hot water heater, a simple yet ingenious creation that stands as a testament to human creativity in the heart of nature.
Building Your Heater
Creating your own hot water heater for camping might seem daunting, but fear not! With these step-by-step instructions and a bit of creativity, you’ll have your portable hot water solution in no time.
Materials and Tools:
Gather the materials listed earlier – a sturdy bucket, copper tubing, a heat source, hose, clamps, and essential tools. Consider the bucket’s size; a 10-gallon one works well for ample water capacity without being too bulky.
Step-by-Step Guide:
- Prepare the Copper Tubing:
- Measure and mark the copper tubing, typically around 15-20 feet long, depending on your desired coil size.
- Using a hacksaw, carefully cut the tubing to the measured length. Smooth out any sharp edges.
- Attach the Tubing to the Bucket:
- Begin by forming the copper tubing into a coil. This will act as the heating element.
- Secure one end of the tubing to the bottom of the bucket using clamps or zip ties. Ensure it’s snug but allows water to flow freely through the coil.
- Create the Heating Coil:
- Depending on your heat source – be it a campfire or a portable stove – mold the tubing into a coil shape that maximizes heat absorption.
- Keep the coil relatively loose to facilitate water circulation and prevent overheating.
- Safety First:
- Wear safety goggles and gloves, especially when handling tools or sharp edges. When using a heat source, exercise caution to prevent burns or fires.
- Test and Adjust:
- Before using the heater, conduct a trial run. Fill the bucket with water and place it near your chosen heat source.
- Observe the water’s temperature and flow through the coil. Adjust the coil’s distance from the heat source for optimal heating without scalding.
Remember, this DIY project encourages creativity. You can experiment with different coil sizes or materials (like stainless steel tubing) to suit your preferences or available resources.
Safety Reminders:
- Always prioritize safety when handling tools and heat sources.
- Use heat-resistant gloves when manipulating hot components.
- Keep a fire extinguisher or water source nearby in case of emergencies.
Materials and Tools:
- Sturdy Bucket: Opt for a robust bucket with a capacity of around 10 gallons. This size ensures you have enough water for your camping needs without being too bulky to transport.
- Copper Tubing: Approximately 20 feet of 1/2-inch diameter copper tubing will serve as the core element of your heater. The copper material facilitates efficient heat transfer, which is crucial for warming the water.
- Heat Source: Whether it’s a campfire or a portable stove, ensure you have a reliable and safe heat source. This will be the energy provider for your heater. Consider the availability of the chosen heat source during your camping trips.
- Hose: To connect your heater to a water source, you’ll need a flexible, heat-resistant hose. Aim for a hose that can withstand temperature fluctuations without compromising its structural integrity.
- Clamps: About 10 medium-sized, adjustable clamps will help secure the copper tubing in place. These clamps ensure the tubing stays coiled within the bucket and maintains its shape during heating.
Choosing the Right Materials:
- Bucket Selection: Look for a durable plastic or metal bucket that can withstand heat without deforming. Consider the weight and size for portability, ensuring it fits comfortably in your camping gear.
- Copper Tubing Quality: Invest in good-quality copper tubing to ensure optimal heat conductivity. Thicker tubing might retain heat better but could limit flexibility during coil formation.
- Heat Source Safety: Prioritize safety when selecting your heat source. If using a campfire, ensure it’s safely contained. For a portable stove, consider stability and fuel efficiency.
Finding the Tools:
- Pliers: These will aid in shaping and manipulating the copper tubing into the desired coil formation.
- Tape Measure: Essential for precise measurements while cutting the copper tubing to the required length.
- Hacksaw: To cut the copper tubing to your desired length accurately.
- Drill: Useful for creating holes in the bucket for tubing placement.
- Safety Gear: Always prioritize safety. Have safety goggles and gloves to protect yourself during the construction process.
Here’s a list of what you’ll need to assemble before diving into this DIY project:
| Materials | Tools |
| Sturdy bucket | Pliers |
| Copper tubing | Tape measure |
| Heat source | Hacksaw |
| Hose | Drill |
| Clamps | Safety goggles |
| Gloves |
These are simple, everyday items you can easily procure from your local hardware store or even repurpose from household items.
Step-by-Step Guide:
- Prepare the Copper Tubing:
The key to efficient water heating lies in the design of the copper tubing. Measure the tubing, aiming for a length between 15 to 20 feet, considering the heating efficiency and portability. With a tape measure and hacksaw, carefully cut the tubing to your desired length.
Pro Tip: Ensure smooth, clean cuts to prevent any sharp edges that might cause injuries or hinder the tubing’s functionality.
- Attach the Tubing to the Bucket:
The foundation of your hot water heater is securing the copper tubing to the bottom of the sturdy bucket. Using pliers, gently shape the tubing into a coil. Position the coil inside the bucket, ensuring it’s firmly secured yet not overly tight to allow water flow.
Tip: Use clamps to hold the tubing in place while you work on the coil formation.
2. Create the Heating Coil:
The heating coil’s efficiency depends on its proximity to the heat source. If using a campfire, shape the tubing into a coil that maximizes exposure to the heat without compromising safety. For a portable stove, adjust the coil for optimal heat transfer.
Safety Note: When handling heat sources, maintain caution to prevent burns or accidental mishaps. Always wear safety goggles and gloves.
3. Test for Functionality:
Before heading into the wild, conduct a test run. Connect the hose to the coil and a water source. Position the heater near the intended heat source and observe the water flow and heating efficiency.
Pro Tip: Adjust the coil’s positioning and distance from the heat source to achieve your desired water temperature. Experimentation will help fine-tune the heater for optimal performance.
For the table, due to limitations in formatting, I’ll provide an example in a simplified format:
DIY Camping Hot Water Heater Setup
| Materials | Quantity | Description |
| Sturdy bucket | 1 | 10-gallon capacity |
| Copper tubing | 20 ft | 1/2-inch diameter |
| Heat source | – | Campfire or portable stove |
| Hose | 1 | Flexible, heat-resistant hose |
| Clamps | 10 | Medium-sized, adjustable |
This table provides an overview of the required materials for constructing the DIY camping hot water heater. Adjust quantities based on personal preferences and usage.
Making it Work
You’ve completed the construction phase, and now it’s time to put your DIY hot water heater to use in the great outdoors.
Setting up Your Heater:
Positioning your heater correctly is key to optimizing its performance. Place the heater near your heat source, whether it’s a crackling campfire or a reliable portable stove. Secure the bucket on a level surface and place it at a safe distance from any flammable materials to ensure stability and safety.
Connecting the Components:
Attach one end of the hose to the water source and the other end to the coil on the bucket. Check for any leaks or loose connections. Once everything is secure, you’re ready to initiate the heating process.
Optimizing Water Temperature:
Fine-tuning the water temperature is akin to mastering an art form. The distance between the heat source and the coil plays a crucial role. Closer proximity to the heat source will increase the water temperature while moving it farther away will lower it. Experiment with different distances until you find the perfect balance for your desired warmth.
Safety First:
When operational, ensure a safe environment. Keep an eye on the heater, especially when near an open flame. Supervision and caution are vital to prevent accidents.
Conserving Resources:
In the camping world, every drop counts. Be mindful of water usage and heat management. Consider reheating water that remains in the coil for maximum efficiency and resourcefulness.
Adjusting for Different Settings:
Whether you’re at a remote campsite or in the backyard, adapt the setup according to the surroundings. The beauty of this DIY heater lies in its versatility, allowing you to create comfort wherever you are.
Practical Tips and Tricks
Your DIY hot water heater is more than just a device for warm showers; it’s a versatile tool for various camping needs.
Usage Scenarios:
- Dishwashing Delight: This heater transforms into your outdoor kitchen’s best friend after a hearty campfire-cooked meal. Fill a basin with warm water and breeze through dishwashing, making cleanup a breeze.
- Hygiene Haven: Whether it’s washing your hands after a day of hiking or freshening up before bedtime, having warm water on demand elevates your camping hygiene game.
- Warmth Where It Counts: On chilly nights, fill a hot water bottle with water to warm your sleeping bag. A little comfort goes a long way in the wilderness.
Troubleshooting:
- Low Water Flow: If you notice reduced water flow, check for kinks or blockages in the tubing. Ensure the hose connection is secure, and the water source provides enough pressure.
- Inconsistent Heating: Adjust the distance between the heater and the heat source. Closer is better for quicker heating, but be cautious of overheating, and farther away is better for a more gradual rise in temperature.
- Leakages: Inspect the connections and tighten any loose clamps or connections to prevent leaks. A secure setup ensures efficient operation.
Adapting for Efficiency:
- Conserving Resources: Be mindful of water usage. Collect and reuse the water whenever possible, especially in areas where water might be scarce.
- Optimal Heat: Experiment with different heat sources and intensities to find the sweet spot for your desired water temperature. Sometimes, a gentle simmer does the trick better than a roaring fire.
Environmental Considerations:
- Leave No Trace: Always adhere to Leave No Trace principles. Dispose of the water responsibly, away from water sources, and avoid damaging the natural environment.
- Fire Safety: When using a campfire as the heat source, ensure it’s safely contained. Be cautious of windy conditions and always extinguish the fire properly after use.
Congratulations, resourceful camper! You’ve unlocked the secret to warm, cozy camping adventures with your very own DIY hot water heater. Remember, it’s not just about the convenience of warm showers; it’s about embracing the spirit of innovation and self-sufficiency in the wild.
Encouragement for Creativity:
Don’t hesitate to tweak the design or experiment with different materials based on your needs and preferences. Your camping experience is unique, and your heater can be too!
Final Thoughts:
As you embark on your next outdoor escapade, armed with your homemade hot water heater, remember that you’re not just camping – you’re elevating your camping game to a whole new level. Cheers to staying warm
Unleashing the Potential of a 55-Gallon Drum Rocket Stove
In a world that constantly champions sustainability and innovation, the concept of repurposing everyday items to serve new functions has gained immense popularity. Among these ingenious creations stands the 55-gallon drum DIY rocket stove, a marvel of DIY craftsmanship that not only repurposes discarded drums but also harnesses the power of efficient wood burning for multiple practical applications.
Imagine transforming a seemingly ordinary 55-gallon drum into a powerful and versatile heating or cooking source. This isn’t just a DIY project; it’s a testament to human ingenuity and a step towards sustainable living. In today’s article, we’ll embark on a journey to understand, construct, and unleash the potential of a 55-gallon drum rocket stove. Strap in as we explore the process, benefits, and applications of this incredible innovation!
Understanding the 55-Gallon Drum Rocket Stove
Design and Functionality:
The 55-gallon drum rocket stove is a testament to simplicity meeting efficiency. Its design revolves around repurposing a standard 55-gallon steel drum, a ubiquitous industrial item, into a highly functional heating or cooking apparatus.
Design Elements: The stove’s design is ingeniously straightforward. The drum serves as the primary structure, providing the necessary space for combustion and heat retention. Its cylindrical shape and steel composition make it durable and well-suited for containing intense heat.
Insulated Combustion Chamber: One of the defining features of the stove is its insulated combustion chamber. This chamber, usually created using bricks, refractory materials, or a layer of sand, ensures that the intense heat generated from the burning wood is retained within the drum. This setup not only maximizes combustion efficiency but also minimizes heat loss, ensuring that the stove remains hot for an extended period.
Airflow and Efficiency: The genius of the rocket stove concept lies in its optimized airflow. The stove’s design directs air efficiently, allowing for a more complete and cleaner combustion process. The combustion chamber, positioned at the bottom of the drum, facilitates controlled burning while the insulated walls guide the heat upwards, creating a strong draft that enhances combustion.
Smoke Reduction and Eco-Friendliness: A remarkable advantage of this stove is its ability to significantly reduce smoke emissions compared to traditional open fires. The efficient combustion process results in minimal smoke output, making it an environmentally friendly choice. This reduction in smoke not only contributes to a cleaner atmosphere but also translates into less fuel wastage and increased fuel efficiency.
Adaptability and Customization: One of the stove’s charms is its adaptability. While the basic design is effective, it’s also highly customizable. Builders can add personal touches or modifications based on specific needs. Whether it’s additional insulation for enhanced heat retention, integrating cooking attachments, or incorporating temperature monitoring systems, the stove’s design accommodates various adaptations, encouraging creativity and innovation.
Economic and Ecological Impact: This stove isn’t just a DIY project; it’s a testament to sustainable living. By repurposing a discarded drum and utilizing wood or biomass efficiently, individuals contribute to waste reduction and eco-conscious practices. Moreover, its cost-effectiveness and accessibility make it an appealing option for those seeking economical and environmentally friendly solutions.
Materials Required for Building a 55-Gallon Drum Rocket Stove
| Materials | Quantity |
| 55-gallon steel drum | 1 |
| Insulating materials (bricks, refractory materials, or sand) | Varies based on choice and design |
| Steel grate or wire mesh | 1 |
| Steel pipes/fittings | As required |
| Fire-resistant paint | 1 can |
| High-temperature sealant | 1 tube |
| Tools (angle grinder, drill, etc.) | As required |
| Fire bricks | Optional, based on design |
| Thermometer | Optional |
This table outlines the essential materials needed for constructing a basic 55-gallon drum rocket stove. It’s important to note that quantities may vary based on personal design choices and specific modifications.
Step-by-Step Construction Guide:
Constructing a 55-gallon drum rocket stove involves a series of carefully planned steps. While the process may vary slightly based on personal preferences and design modifications, the fundamental construction remains consistent.
Step 1: Drum Preparation
- Gather Your Materials: Refer to the materials list (Table 1) and ensure everything is at hand.
- Prepare the Drum: Thoroughly clean the drum to remove any residues or contaminants. Use a wire brush and soap to scrub both the interior and exterior. Rinse and let it dry completely.

Step 2: Creating the Combustion Chamber
- Mark and Cut: Determine the height for the combustion chamber (typically around 16-18 inches from the bottom). Use a marker to outline the cutting line and an angle grinder to make the cut.
- Insulation Layer: Place bricks, refractory materials, or sand inside the drum, forming a base layer of insulation. This layer provides heat retention and promotes efficient burning.
- Insert Grate or Wire Mesh: Position a steel grate or wire mesh above the insulation layer to support the wood for burning.
Step 3: Assembling the Stove
- Positioning Steel Pipes: Create an inlet for airflow by inserting steel pipes or fittings at an angle into the drum. This forms the air intake system that promotes efficient combustion.
- Sealing and Finishing: Use high-temperature sealant to secure the pipes in place and seal any gaps. Apply fire-resistant paint to the exterior of the drum for added protection and aesthetics.
Step 4: Testing and Adjustments
- Test the Stove: Before regular use, conduct a test burn to ensure proper functionality and efficiency.
- Make Adjustments: Monitor the airflow and combustion. If needed, make adjustments to the air intake system or insulation for optimal performance.
Tips and Considerations:
- Safety First: Always wear appropriate safety gear, including gloves and eye protection, when handling tools and materials.
- Personalization: Feel free to personalize your stove design, adding features like additional insulation layers or temperature monitoring systems based on your needs
Benefits and Applications:
The versatility and efficiency of a 55-gallon drum rocket stove extend far beyond its construction process. Understanding its benefits and diverse applications can truly highlight its value in both domestic and outdoor settings.
-
Energy Efficiency:
- Reduced Fuel Consumption: The rocket stove’s design maximizes heat production while minimizing wood consumption, making it an energy-efficient choice for cooking or heating.
- Minimal Smoke Emissions: Its efficient combustion process significantly reduces smoke output compared to traditional open fires, contributing to a cleaner environment.
-
Versatility in Usage:
- Cooking: Whether for outdoor gatherings, camping trips, or even as a supplementary stove at home, the rocket stove offers a reliable cooking source.
- Heating: Its concentrated heat output makes it suitable for warming outdoor spaces during chilly evenings or as an emergency heat source.
-
Cost-Effectiveness and Accessibility:
- Affordability: Utilizing repurposed materials like a 55-gallon drum keeps construction costs low, making it accessible for DIY enthusiasts with varying budgets.
- Readily Available Materials: The necessary components can often be sourced locally or salvaged, contributing to its accessibility and eco-friendliness.
-
Eco-Friendly Nature:
- Reduced Carbon Footprint: By burning wood more efficiently, the stove minimizes carbon emissions and supports sustainable practices.
- Waste Reduction: Repurposing a discarded drum contributes to waste reduction and promotes recycling.
-
Adaptability and Innovation:
- Modifiability: Its basic design allows for modifications or enhancements, encouraging individuals to innovate and personalize their stove for specific needs.
- Learning and Skill Development: Building a 55-gallon drum rocket stove serves as an educational DIY project, fostering skills in construction and sustainability.
Practical Tips:
- Proper Ventilation: Ensure adequate ventilation when using the stove indoors to prevent carbon monoxide buildup.
- Supervision: Always supervise the stove while in use, especially around children or pets.
Safety Measures and Maintenance:
While the 55-gallon drum rocket stove is a remarkable innovation, ensuring safety during its use is paramount. Implementing proper safety measures and adhering to maintenance guidelines not only prolongs the stove’s lifespan but also safeguards users and surroundings.
-
Operating Safety Precautions:
- Ventilation: Always operate the stove in a well-ventilated area, especially when used indoors, to prevent the accumulation of harmful gases.
- Keep Clear Space: Maintain a clear zone around the stove, away from flammable materials or surfaces.
- Supervision: Never leave the stove unattended while in use, especially when children or pets are present.
-
Heat Management:
- Surface Temperature: Be mindful of the stove’s surface temperature, especially during operation. Avoid direct contact to prevent burns.
- Cooling Down Period: Allow the stove to cool down completely before conducting any maintenance or modifications.
-
Maintenance Guidelines:
- Regular Cleaning: Periodically clean the stove to remove ash or debris, ensuring optimal airflow and combustion.
- Inspection: Check for any signs of wear, rust, or damage. Replace or repair parts as necessary to maintain safety and efficiency.
- Sealant Inspection: Monitor the sealant and insulation integrity, reapplying or repairing any damaged areas to prevent heat leaks.
-
Emergency Preparedness:
- Fire Safety: Keep a fire extinguisher nearby and ensure everyone knows its location and how to use it.
- Emergency Plan: Have an evacuation plan in place in case of unforeseen accidents or emergencies.
Final Thoughts on Safety: The importance of safety cannot be overstated when using a 55-gallon drum rocket stove. By adhering to these precautions and guidelines, users can enjoy the benefits of the stove while minimizing risks and ensuring a safe environment for all.

Inspiration for Further Innovation:
The beauty of the 55-gallon drum rocket stove lies not just in its construction but in the endless possibilities for modifications and enhancements. Here, we’ll explore avenues for readers to innovate and personalize their stoves based on their unique needs and preferences.
-
Customization Ideas:
- Additional Insulation Layers: Experiment with different insulating materials or multiple layers for enhanced heat retention.
- Temperature Monitoring: Incorporate a thermometer to monitor and optimize combustion temperatures.
- Cooking Attachments: Explore attachments or modifications to adapt the stove for specific cooking needs.
-
Exploring Alternative Designs:
- Different Drum Sizes: Consider using drums of varying sizes for smaller or larger-scale stoves, adapting the design accordingly.
- Multi-Functional Stoves: Explore designs that integrate features for both heating and cooking in a single unit.
-
Sharing and Collaboration:
- Online Communities: Engage with online forums or communities where DIY enthusiasts share their stove-building experiences and innovative ideas.
- Collaborative Projects: Consider collaborating with others to exchange ideas and collectively develop innovative stove designs.
Encouragement to Innovate: The 55-gallon drum rocket stove serves as a starting point for creativity and innovation. Readers are encouraged to experiment, share their ideas, and contribute to the growing community of stove innovators. Embracing a spirit of innovation can lead to personalized and improved stove designs that cater to diverse needs.
Conclusion:
The journey through the realm of the 55-gallon drum rocket stove has unveiled not just a DIY project, but a gateway to sustainability, innovation, and practicality. This innovative creation, born from repurposing discarded materials, embodies the spirit of resourcefulness and resilience.
As we’ve explored its construction, benefits, safety measures, and the endless possibilities for customization, it’s evident that the 55-gallon drum rocket stove isn’t just about efficient wood burning—it’s a symbol of empowerment. It empowers individuals to take charge of their energy needs, promoting self-sufficiency and responsible living.
Its adaptability to various settings, whether in the kitchen, outdoor adventures, or as an emergency heating source, exemplifies its versatility. Moreover, the stories and experiences shared by individuals who have embraced this stove further emphasize its practicality and impact on daily lives.
As we conclude this exploration, let’s carry forward the ethos of innovation and sustainability that the 55-gallon drum rocket stove embodies. Let’s continue to repurpose, innovate, and share knowledge, contributing to a more sustainable and conscious world—one stove at a time.
Making Papercrete Water-Wise: Waterproofing Techniques Demystified
Introduction:
In the developing landscape of sustainable building, papercrete stands as a testament to innovation. Born from combining recycled paper pulp, cement, and other materials papercrete represents the fusion between eco-friendliness and flexibility and its lightweight structure, thermal insulation abilities, and moldability have positioned it as a strong contender among modern construction materials.
However, hiding amongst its array of benefits lies a fundamental weakness – its sensitivity to moisture. Picture a structure crafted with meticulous care embracing sustainability and resourcefulness, only to give in to the subtle effects of water over time. This Achilles’ heel poses a major challenge, casting doubt over the durability and usefulness of papercrete in various building projects.
Water, in its relentless quest to soak in and permeate poses a formidable threat to the integrity of papercrete structures. Left unprotected, this composite material can slowly degrade, making months or years of craftsmanship vulnerable to decay and compromise. Hence, the urgent need for waterproofing emerges as a pivotal chapter in the story of papercrete’s evolution – a crucial effort to strengthen its resilience against the elements.
In this comprehensive guide, we embark on an exploration into waterproofing papercrete, demystifying the techniques and strategies that safeguard its structural integrity. We delve deep into the intricacies of surface sealants, integral additives, and even eco-conscious DIY methods seeking to unlock the secrets that lift papercrete from vulnerability to durability.
This whole thing is really about looking at waterproofing papercrete not just as a technical challenge but trying to understand what it represents. As we explore different methods to keep moisture out, it’s actually about making sure the potential of this sustainable building material shines through. These structures should stand for pushing forward new eco-friendly ways of building things.
So, the journey here is about the innovation behind papercrete as much as just finding the best waterproofing method. We want the final structures to capture those ideals of sustainability and endurance. That’s the point, to have buildings that don’t just stand up to weather but also stand for something bigger.
Understanding Papercrete:
The Green Building Material
Papercrete stands as a remarkable fusion of sustainability and innovation within the construction industry. Originating from a blend of paper pulp, cement, and various additives, it’s a material that redefines eco-conscious building practices.
Composition and Ingredients:
The magic of papercrete lies in its composition. Typically, it comprises shredded paper or cardboard, cement, and often additional components like sand, clay, or lime. The shredded paper acts as the primary fibrous material, while the cement serves as the binding agent, creating a versatile, lightweight substance.
Eco-Friendly Nature:
One of the most striking features of papercrete is its eco-friendly footprint. Utilizing recycled paper in its production reduces the demand for new raw materials and mitigates waste. This environmentally conscious approach aligns with the principles of sustainable construction, offering an alternative to resource-intensive conventional building materials.
Versatility and Properties:
Despite its lightweight nature, papercrete exhibits impressive insulating properties, providing thermal and acoustic insulation. Its versatility allows it to be molded into various shapes and forms, making it suitable for diverse construction applications such as walls, insulation, and even sculptural elements.
Strengths and Challenges:
While papercrete showcases commendable eco-friendliness and adaptability, it’s not without its challenges. Its susceptibility to moisture stands out as a primary concern. Unprotected papercrete structures can suffer degradation when exposed to water for extended periods. Hence, the importance of effective waterproofing strategies cannot be overstated.
Applications in Modern Construction:
The unique blend of sustainability and versatility has led to the integration of papercrete in various construction projects worldwide. From housing to artistic installations, its use spans across domains where eco-friendly and customizable building materials are in demand.
Future Prospects:
With the increasing emphasis on sustainable building practices, papercrete continues to gain attention and adoption within the construction industry. Innovations in its formulation and applications hold promise for further advancements, paving the way for more eco-friendly and resilient construction solution

Free Trial for Kindle Unlimited
The Waterproofing Challenge:
Papercrete’s composition, a blend of paper pulp, cement, and additives, grants it remarkable qualities such as insulation, eco-friendliness, and versatility. However, its susceptibility to moisture poses a significant challenge in its application and long-term durability.
When left exposed to water or moisture, papercrete can undergo degradation, compromising its structural integrity. The cellulose fibers in the paper component of papercrete, while contributing to its lightweight and insulating properties, are also highly absorbent. This absorbency makes untreated papercrete susceptible to swelling, warping, and even disintegration when subjected to prolonged moisture exposure.
The vulnerability to moisture underscores the critical need for waterproofing in papercrete structures. Whether it’s used in walls, insulation, or other construction elements, protecting papercrete from water intrusion is paramount to ensure its longevity and performance.
Unprotected papercrete structures can experience issues such as:
- Deterioration: Continuous exposure to moisture can lead to the breakdown of the paper fibers within the papercrete mixture, weakening the overall structure over time.
- Mold and Mildew Growth: Moisture accumulation can create an ideal environment for mold and mildew to thrive, not only compromising the structural integrity but also posing health risks.
- Reduced Insulation Properties: Waterlogged papercrete loses its insulating capabilities, impacting its efficiency in regulating temperature and energy conservation.
Addressing the waterproofing challenge is not merely about preserving the structural integrity of papercrete; it’s also about unlocking its full potential as a sustainable building material. By employing effective waterproofing techniques, builders and architects can extend the lifespan of papercrete structures, broaden their applications, and promote environmentally conscious construction practices.
In the subsequent sections, we’ll explore various proven techniques for waterproofing papercrete, providing insights into surface sealants, integral additives, natural solutions, and best practices to ensure durable and water-resistant papercrete structures.
Popular Waterproofing Techniques:
Waterproofing papercrete involves various approaches, each with its unique advantages and considerations. Understanding these techniques is crucial in choosing the most suitable method for your project.
Surface Sealants:
Surface sealants are among the most accessible and widely used methods for waterproofing papercrete. These sealants, commonly acrylic-based or silicate-based, create a protective layer on the surface of the papercrete structure.
Pros:
- Ease of Application: Applying surface sealants requires minimal expertise and can be done with basic tools.
- Immediate Protection: Once applied, surface sealants provide quick waterproofing, offering immediate protection against moisture penetration.
Cons:
- Reapplication Requirement: Over time, surface sealants may wear off, necessitating periodic reapplication to maintain effectiveness.
- Vulnerability to Wear: Heavy wear and tear can compromise the efficacy of surface sealants, requiring regular monitoring and touch-ups.
Integral Waterproofing Agents:
Integral waterproofing agents involve incorporating additives directly into the papercrete mix during the preparation stage. These additives chemically alter the mix, providing a consistent waterproofing effect throughout the structure.
Pros:
- Uniform Waterproofing: Integral additives ensure comprehensive protection, penetrating the entire papercrete structure for a consistent waterproofing layer.
- Long-Lasting Protection: Once integrated, these agents offer enduring waterproofing, reducing the need for frequent reapplications.
Cons:
- Alteration of Mix Properties: Adding integral waterproofing agents can modify the properties of the papercrete mix, potentially affecting its consistency or other performance characteristics.
- Additional Cost and Measurement Precision: Careful measurement and consideration of costs are essential when incorporating these additives, adding complexity to the construction process.
Natural and DIY Methods:
For those inclined towards eco-friendly and DIY approaches, various natural solutions serve as effective waterproofing agents for papercrete structures. These solutions might include natural oils (like linseed or tung oil) or beeswax.
Pros:
- Environmentally Friendly: Natural solutions align with eco-conscious construction practices, reducing the use of synthetic materials.
- Cost-Effectiveness: They often present cost-effective alternatives compared to commercially available sealants or additives.
Cons:
- Reapplication and Maintenance: Natural solutions may require more frequent reapplication and maintenance compared to other methods, impacting long-term costs and efforts.
- Effectiveness Under Stress: Performance under extreme conditions or heavy exposure to water might vary compared to synthetic sealants or integral additives.
| Waterproofing Technique | Description | Pros | Cons |
| Surface Sealants | These sealants, such as acrylics or silicates, are applied to the surface of papercrete to create a waterproof barrier. | – Easy application
– Provides immediate protection |
– May require reapplication – Vulnerable to wear and tear |
| Integral Waterproofing Agents | Additives are mixed directly into the papercrete mix to create a waterproofing effect throughout the structure. | – Ensures uniform waterproofing
– Long-lasting protection |
– Alters the papercrete mix properties
– Additional cost and careful measurement required |
| Natural and DIY Methods | Eco-friendly alternatives like natural oils, beeswax, or linseed oil provide a protective layer to repel water. | – Environmentally friendly
– Cost-effective options |
– Requires reapplication – May need more frequent maintenance |
Step-by-Step Waterproofing Process:
Waterproofing papercrete involves a systematic approach to ensure effective protection against moisture. Here’s a detailed breakdown of the process:
-
- Preparation: Cleaning and Surface Readiness
Before applying any waterproofing material, thorough preparation of the papercrete surface is essential. Begin by cleaning the surface meticulously, removing any dust, dirt, or loose particles. A stiff-bristled brush or a vacuum cleaner can be used to ensure a clean and debris-free surface. In cases where the papercrete has been exposed to weather or has accumulated grime, a gentle pressure wash might be necessary.
Additionally, inspect the surface for any cracks or imperfections. Fill these with an appropriate filler compatible with papercrete to ensure a smooth and even surface. Remember, the effectiveness of waterproofing greatly depends on the surface’s cleanliness and uniformity.
2. Application of Waterproofing Material
Applying the material according to the manufacturer’s instructions or the formulated DIY approach depends on the chosen waterproofing technique.
- Surface Sealants: If utilizing surface sealants, ensure the papercrete surface is completely dry before application. Using a brush, roller, or sprayer, evenly apply the sealant, ensuring comprehensive coverage. Multiple thin coats are often more effective than a single heavy coat. Allow adequate drying time between coats as per the manufacturer’s recommendations.
- Integral Waterproofing Agents: Incorporating integral waterproofing agents into the papercrete mix involves adding the agent during the mixing process itself. Follow the recommended dosage provided by the agent manufacturer and ensure thorough mixing for uniform distribution. Be cautious not to overuse the additives, as this may alter the papercrete’s properties and compromise its structural integrity.
- Natural and DIY Methods: For natural alternatives like beeswax, linseed oil, or natural oils, apply the chosen substance evenly across the surface using a brush or cloth. Ensure complete coverage and pay attention to areas prone to water ingress. Multiple applications may be necessary for optimal protection
3. Drying and Curing: Ensuring Stability
After the application phase, allow ample time for the waterproofing material to dry and cure. The duration varies based on the specific material used, environmental conditions, and application method. It’s crucial to follow the recommended drying and curing times provided by the manufacturer to achieve the desired waterproofing effect.During this period, protect the treated surface from moisture or water exposure to prevent interference with the curing process. Adequate curing time is vital for the waterproofing material to form a durable and protective barrier against water infiltration.
Tips and Best Practices:
Waterproofing papercrete isn’t just about applying a sealant; it requires a nuanced approach to ensure long-lasting protection for your structures. Here are some essential tips and best practices:
- Surface Preparation Is Key: Before applying any waterproofing material, ensure the surface is clean, dry, and free from any contaminants. Remove dust, dirt, and loose particles to facilitate better adhesion of the waterproofing layer.
- Choose Wisely: Different projects might demand different waterproofing methods. Consider the specific requirements of your structure, environmental factors, and budget constraints when selecting a technique. For instance, integral additives might be more suitable for larger projects, while natural oils could work better for smaller, eco-centric builds.
- Follow Manufacturer’s Recommendations: Adhere strictly to the manufacturer’s instructions when using commercial sealants or additives. This includes application methods, recommended temperatures, curing times, and safety precautions. Following these guidelines ensures optimal performance of the waterproofing material.
- Regular Maintenance: Waterproofing materials, such as any protective coating, can degrade over time. Regular inspections and maintenance are performed to identify any signs of wear or damage. Small repairs and reapplications can significantly extend the lifespan of the waterproofing layer.
- Climate Considerations: Climate plays a vital role in the effectiveness of waterproofing. In areas prone to heavy rainfall or extreme temperatures, choose waterproofing materials that are specifically designed to withstand such conditions. Additionally, in areas with high humidity, ensure adequate drying time for the applied waterproofing materials.
- Test and Monitor: Before full-scale application, conduct a small test on a discreet area to assess the compatibility and effectiveness of the chosen waterproofing method. Monitor this area over time to gauge its durability and performance.
- Consultation and Expertise: When in doubt, seek advice from professionals experienced in papercrete construction or waterproofing techniques. Their expertise can provide invaluable insights and recommendations tailored to your specific project.
By incorporating these tips into your waterproofing process, you’ll enhance the effectiveness and longevity of the protective layer, ensuring your papercrete structures withstand the test of time and environmental factors.
Real-Life Applications:
Papercrete, with its waterproofed capabilities, has been a game-changer in various construction scenarios. Here are some compelling examples highlighting its successful integration and the impact of waterproofing techniques:
Residential Housing Projects:
-
- Showcasing the Durability: Several housing projects across regions prone to varying climatic conditions have embraced waterproofed papercrete. Thanks to robust waterproofing strategies, houses in humid environments or areas with frequent rainfall have sustained their structural integrity over time. This has significantly reduced maintenance costs while offering sustainable living spaces.
- Commercial and Public Structures:
- Functional and Aesthetic Appeal: Large-scale structures like community centers, schools, or commercial buildings have utilized waterproofed papercrete for its versatility. The waterproofing techniques have not only preserved the structural strength but have also facilitated creative designs. These buildings stand as testaments to the potential of waterproofed papercrete in combining functionality with aesthetic appeal.
- Emergency Shelter Initiatives:
- Rapid Deployment and Reliability: In disaster-prone areas, the quick construction of temporary shelters is crucial. With its lightweight yet durable nature, waterproofed papercrete has been pivotal in swiftly setting up emergency shelters. These structures withstand challenging weather conditions and provide shelter for displaced communities, highlighting the humanitarian aspect of waterproofed papercrete applications.
- Innovative Architectural Installations:
- Artistic and Experimental Ventures: Architects and artists have explored the artistic possibilities of waterproofed papercrete. Installations in parks, museums, and public spaces exhibit the creative potential of this material. Its waterproofed surface ensures the longevity of these installations, allowing them to withstand outdoor exposure while captivating audiences with their creativity.
- Testimonials and Success Stories:
- Experiences from Professionals: Architects, engineers, and builders have shared their experiences with waterproofed papercrete. Testimonials highlighting successful projects, challenges faced, and the effectiveness of specific waterproofing techniques offer valuable insights. These firsthand accounts provide credibility and practical advice for others considering similar endeavors.
Conclusion:
Papercrete is a pretty neat building material made from recycled paper, cement, and other stuff. It’s way more eco-friendly than regular concrete or wood. But it has a big problem – moisture messes it up and makes it fall apart. If we wanna use papercrete more, we gotta figure out how to waterproof it. Putting sealants or additives on the surface could work. Or maybe some natural waterproofing methods? If we get creative, I bet we can find good solutions and making papercrete waterproof isn’t just practical – it shows we care about sustainable construction. We want buildings that last AND help the environment. Choosing the right waterproofing method is key to making papercrete live up to its green potential. As we keep trying new eco-materials, innovation plus sustainability should stay top priorities. Waterproofing papercrete isn’t just necessary – it embodies our responsibility to build resilient, earth-friendly structures. It shows that the construction industry can keep adapting and still care about the planet. If we want durable, green building solutions we gotta perfect waterproofing papercrete. Its a test of our commitment to sustainability. There are still challenges but I’m optimistic we can figure it out!
Bouncing into Dreamland: Exploring the Trampoline Bed for Your Best Sleep Yet
Introduction
When envisioning bedtime, thoughts of sinking into a soft mattress, wrapped in comfort, often come to mind. However, imagine if there was a way to lift this experience – quite literally? Picture a bed that not only invites you to lie down but also bounces into a whole new level of sleep. That’s where the concept of the trampoline bed comes in. At first, the idea may seem fanciful or even a bit strange. After all, beds have been flat, sturdy structures built for stability and support since the beginning of time. Through sleep innovation technology has daringly leaped into unexplored areas, considering if a bit of bounce could be the key ingredient for a truly peaceful night’s sleep and the trampoline bed is not your normal sleeping surface. It’s a bold rethinking of bedtime comfort – an elastic, buoyant sanctuary challenging the norms of traditional bedding. Rather than fitting the standard mold of a flat mattress, these beds include the familiar elasticity and bounce of a trampoline blending playfulness with practicality for sleep. Imagine this – a sleep surface that flexes and reacts to your movements, gently cradling you into relaxation. It’s not about bouncing all night; it’s about the subtle, rhythmic sway mimicking the body’s natural motions, making an almost weightless feeling that lulls you into dreamland. You might wonder why anyone wants a bouncy bed. It’s an interesting question that makes people curious about trampoline beds. There’s more to it than just being silly – the idea is that bouncing while you sleep could improve your rest. So, as we look into this keep an open mind that bedtime could involve more than just lying still. Come with me to learn about the science and stories of dozing off while bouncing gently into a dream world.
The Trampoline Bed: What’s the Buzz About?
| Aspect | Traditional Bed | Trampoline Bed |
| Design | Flat, mattress-based | Bouncy, trampoline-like surface |
| Construction Material | Springs or foam | Elastic and durable materials |
| Sleep Experience | Firm or soft options | Adaptive bounce and support |
Imagine a bed that’s not just a passive platform for sleep but an active participant in ensuring your nightly rest is as rejuvenating as possible. Trampoline beds bring a whole new dimension to bedtime comfort. Unlike traditional mattress-based beds, trampoline beds feature a design reminiscent of a giant, cushioned trampoline. The surface is not flat but rather comprises an elastic, bouncy material that responds to your body’s movements with a subtle yet supportive bounce.
Design:
While conventional beds rely on mattresses made of foam or springs atop a rigid frame, trampoline beds take a radically different approach. They replace the typical mattress with an elastic, responsive surface that mimics the sensation of bouncing on a trampoline. This innovative design aims to provide a dynamic sleep experience, offering both support and adaptability.
Construction Material:
The materials used in trampoline beds differ significantly from those in traditional mattresses. These beds incorporate elastic and durable materials that allow for a responsive surface. The elasticity of the bed’s material enables it to adjust to the sleeper’s movements, promoting a more personalized and comfortable sleep environment.
Sleep Experience:
The unique construction of trampoline beds creates an experience unlike that of traditional mattresses. Rather than a static surface, these beds offer an adaptive bounce that responds to your body’s movements. This feature not only supports your body but also offers a gentle, soothing sensation that can aid in relaxation, potentially leading to improved sleep quality.
Trampoline beds redefine the very notion of bedtime comfort by providing a surface that’s not just a place to lay your head but a partner in your quest for a peaceful night’s sleep. The buoyant, responsive nature of these beds aims to deliver a sleep experience that’s more dynamic and personalized than ever before.
The Science Behind the Bounce
The seemingly playful bounce of a trampoline bed isn’t just for fun—it’s backed by scientific principles aimed at enhancing sleep quality. The elastic surface of these beds isn’t just a novelty; it’s a carefully engineered feature that taps into the body’s natural rhythms.
Ergonomic Support: Trampoline beds are designed to distribute weight evenly, offering support where it’s needed most. This adaptive surface reacts to pressure points, allowing your body to sink in comfortably while maintaining crucial support. The bounce isn’t about jostling; it’s about responding to your movements, providing a cocoon-like feeling without the confinement of a rigid surface.
Promoting Relaxation: The gentle, rhythmic bounce of a trampoline bed mimics the soothing motion known to lull babies to sleep. This movement has a relaxing effect on the nervous system, encouraging the release of tension and promoting a sense of calmness before drifting off into dreamland.
Enhanced Blood Circulation: The subtle bounce might seem unconventional, but it has a purpose. It stimulates blood flow, preventing stiffness and ensuring a more restful sleep. Improved circulation means better oxygenation of muscles, potentially reducing aches and aiding in quicker recovery from daily stresses.
Pressure Relief: Traditional beds often create pressure points, leading to discomfort during sleep. Trampoline beds, with their adaptive bounce and responsive surface, alleviate these pressure points, reducing tossing and turning throughout the night.
Sleep Cycle Optimization: The bounce isn’t just about immediate comfort; it can impact the entire sleep cycle. By promoting relaxation and minimizing disturbances, trampoline beds aim to enhance the overall quality of sleep, potentially leading to more rejuvenated mornings.
Research into the effects of trampoline beds on sleep quality is ongoing. Early findings suggest that the adaptive bounce and ergonomic support play a significant role in facilitating a deeper, more restorative slumber.
These scientific principles underscore the innovation behind trampoline beds, highlighting their potential to revolutionize the way we approach sleep and comfort.
Who’s it For?
Trampoline beds aren’t exclusive to a particular demographic; rather, they cater to a variety of sleepers with distinct needs and preferences.
Back Pain Sufferers:
For individuals grappling with chronic back issues, the adaptive bounce of a trampoline bed can offer a respite. Unlike conventional mattresses that might exacerbate pressure points, the dynamic support and contouring properties of trampoline beds alleviate strain on the back, potentially promoting better spinal alignment.
Active Sleepers:
Do you toss and turn in your sleep? Trampoline beds are designed to respond to movement, providing a responsive surface that adjusts to your shifting positions throughout the night. This feature is particularly appealing to active sleepers who often find themselves repositioning to get comfortable.
Seekers of Unique Sleep Experiences:
Beyond addressing specific sleep concerns, trampoline beds appeal to those seeking novelty and a break from the traditional. The gentle bounce, reminiscent of childhood fun, introduces an element of playfulness into bedtime routines. It’s an excellent choice for individuals keen on exploring unconventional sleep setups.
Side Sleepers:
The adaptability of trampoline beds is especially advantageous for side sleepers. These sleepers often struggle with finding a mattress that offers sufficient support without creating discomfort at pressure points, like the shoulders and hips. The contouring nature of trampoline beds ensures a more even distribution of weight, reducing the likelihood of waking up with soreness.
Sleep Partners with Varying Preferences:
Couples with differing sleep preferences can also benefit from trampoline beds. The surface’s adaptability accommodates varying firmness preferences, ensuring both partners find a comfortable sleeping experience without compromise.
Note of Caution:
While trampoline beds offer versatility and comfort, individuals with specific medical conditions or unique sleep requirements must consult with healthcare professionals before making a switch. Personal health considerations, such as allergies, mobility issues, or specific medical advice, should always be taken into account when considering a new sleep surface.
In essence, trampoline beds aren’t limited to a particular subset of sleepers; instead, their adaptive nature caters to a wide range of individuals, each seeking a distinct sleep experience tailored to their needs and preferences.
5. Debunking Myths and Concerns
Trampoline beds often face skepticism and misconceptions, deterring potential buyers from embracing this innovative sleep solution. Let’s unravel some of these myths and address prevalent concerns:
Myth 1: Trampoline beds are unsafe for sleep.
Reality: Safety concerns regarding trampoline beds largely stem from misconceptions about stability and durability. Modern trampoline beds are engineered with robust materials and a stable base, ensuring a secure and safe sleep surface. Manufacturers prioritize safety standards, integrating supportive structures and reliable components, making them as safe as traditional beds.
Myth 2: They’re uncomfortable due to constant bouncing.
Reality: The term “trampoline bed” might conjure images of perpetual bouncing, but in reality, these beds are engineered for controlled and gentle movements. The elasticity of the materials provides responsive support, contouring to the body’s shape while minimizing excessive bounce. Users report an initial adjustment period, but once acclimated, they appreciate the subtle, soothing movement that aids relaxation.
Myth 3: Trampoline beds lack durability and longevity.
Reality: Early trampoline beds might have faced durability issues, but advancements in materials and construction have significantly improved their longevity. High-quality elastic materials, reinforced frames, and careful engineering ensure these beds withstand regular use for extended periods. Manufacturers often provide warranties, offering reassurance regarding their durability and longevity.
Myth 4: They’re only suitable for specific sleeping positions.
Reality: Trampoline beds cater to various sleeping positions, from back sleepers to side sleepers and even those who tend to toss and turn throughout the night. Their adaptive surface contours to different body shapes, provide adequate support regardless of the preferred sleeping position. However, personal preferences play a role, and some individuals might find certain models more suitable based on their sleep habits.
Addressing these misconceptions highlights the evolution and reliability of trampoline beds as a viable sleep solution. While concerns were valid in the past, technological advancements and stringent quality control have made trampoline beds a safe, durable, and versatile choice for quality sleep.
Making the Leap: Things to Consider Before Purchasing
Investing in a trampoline bed might seem like a leap of faith, but with careful consideration, you can ensure that your choice aligns perfectly with your sleep preferences and needs.
Size Matters:
Trampoline beds come in various sizes, much like traditional beds. Consider the dimensions that best suit your space and personal comfort. Whether you’re looking for a twin-sized trampoline bed for a cozy room or a king-size for a spacious haven, ensure it fits your room without overwhelming the space.
Material and Construction:
The materials used in crafting a trampoline bed greatly impact its comfort and durability. Assess the bed’s construction—look for quality elastic materials that provide the right balance between bounce and support. Consider factors like breathability and hypoallergenic properties, especially if you have specific allergies or preferences.
Budget Considerations:
While the allure of a high-end trampoline bed might be tempting, it’s essential to set a budget that aligns with your financial capacity. Trampoline beds come in a range of prices, and while costlier options might boast additional features, there are often affordable options that offer quality sleep experiences without breaking the bank.
Durability and Warranty:
As with any investment, durability is key. Look into the bed’s longevity and check for warranties. Reputable manufacturers often offer warranties that cover any defects or issues with the bed’s materials or construction, providing added peace of mind.
Trial Periods and Return Policies:
Given the uniqueness of the trampoline bed’s sleep experience, some companies offer trial periods. This allows you to test the bed in the comfort of your home for a designated time. Additionally, familiarize yourself with the return policy in case the bed doesn’t meet your expectations.
User Reviews and Reputation:
Researching user reviews and the reputation of different brands can be immensely helpful. Real-life experiences shared by others can offer insights into comfort, durability, and customer service, aiding in making an informed decision.
Compatibility with Bedding:
Consider how your current bedding, such as sheets and covers, will work with a trampoline bed. Some variations in mattress depths and designs might require specific or adaptable bedding, ensuring a snug fit without compromising on comfort.
Consulting a Sleep Specialist:
If you have specific sleep concerns or health conditions, consulting a sleep specialist or healthcare professional can provide valuable guidance. They can offer personalized advice on whether a trampoline bed aligns with your sleep needs.
By carefully evaluating these factors before making a purchase, you can ensure that the trampoline bed you choose aligns with your comfort preferences, budget, and sleep requirements.
Tips for Optimal Trampoline Bed Sleep
Transitioning to a trampoline bed might feel like a leap into the unknown, but with a few adjustments and mindful practices, you can make this transition smoother and enhance your sleep experience:
- Gradual Transition: Start by spending short periods on the trampoline bed initially. Gradually increase the duration as your body adapts to the unique bounce and feel.
- Pillow Selection: Experiment with different pillows to find the right height and firmness that complements the bed’s bounce and support. Memory foam or adjustable pillows often work well.
- Bedding Choices: Opt for breathable and flexible bedding materials. These can complement the trampoline bed’s movement, allowing you to experience the bounce without feeling restricted.
- Sleep Position Awareness: Trampoline beds may encourage different sleep positions due to their responsive surface. Experiment with various sleeping positions to find what feels most comfortable and supportive for you.
- Mindful Movement: Embrace the bounce! Use it to your advantage by engaging in gentle movements or stretches before bedtime. This can help relax your muscles and ease into a restful state.
- Routine is Key: Establish a consistent bedtime routine. Engage in calming activities like reading or meditating to signal your body that it’s time to wind down and prepare for sleep.
- Patience and Adjustment: Understand that adjusting to a new sleep surface takes time. Be patient with yourself and allow your body to adapt gradually. It might take a few nights to feel completely at ease.
- Temperature Control: Trampoline beds allow for airflow beneath the surface. Adjust room temperature and bedding to ensure you stay comfortably cool or warm during the night.
- Maintenance Matters: Regularly check and maintain the trampoline bed’s structure and elasticity. Follow manufacturer guidelines for cleaning and care to ensure its longevity and performance.
Remember, everyone’s sleep preferences differ, so what works for one person might not necessarily work for another. Take these tips as a starting point and tailor them to suit your individual sleep needs and comfort.
Conclusion
Bouncing Into Dreamland: The Trampoline Bed Phenomenon
Can’t sleep? Welcome to the club. In our nonstop world, a good night’s rest is a precious commodity. No wonder so many of us are intrigued by the trampoline bed – part furniture, part toy, it’s an oddball idea that just might be crazy enough to work. Picture this: instead of staring at the ceiling waiting for sleep to come you nestled into a cozy, bouncy cocoon. The gentle rocking motions lull you into relaxation as the day’s stressors bounce away and no more tossing, turning, or counting sheep – it’s immersive, womb-like comfort. The feedback from early adopters speaks volumes. Beyond the novelty factor, people struggling with insomnia, injuries, and chronic pain are finding real relief and quality slumber. It’s playful yet purpose-driven – a serious solution hiding in plain sight. Granted, adjusting to a trampoline mattress takes some getting used to. But with patience and smart sleep habits, bouncing off to dreamland could become second nature. So why not take a leap of faith? The trampoline bed flips the script on what a good night’s sleep can look like. part furniture part wellness aid, it brings us back to the simple joy of a child-like slumber. Nighty night. . . and sweet dreams.
The Ultimate Guide to Building and Enjoying Your Rocket Stove Hot Tub
Introduction:
Can you picture a peaceful night, with stars dotted across the sky and a soft wind brushing your skin? You walk out to your backyard and see something straight from a dream – a welcoming tub with steaming, bubbly water glowing warmly. This isn’t some fancy spa; it’s your escape – a hot tub heated by a rocket stove, and nowadays, when folks want to relax, it usually costs them an arm and a leg. But a rocket stove hot tub provides a refreshing option. It’s not just about soaking in heated water; it’s about simplicity, sustainability, and the happiness that comes from making something with your own two hands.
Defining the Rocket Stove Hot Tub
Imagine the fusion of a regular tub, a specially designed rocket stove, and a clever water circulation system. This isn’t just a hot tub; it’s a marvel of engineering ingenuity, utilizing the principles of thermosiphon and convection to create a self-regulating, heat-generating system.
The Appeal of Sustainable Luxury
What makes the Rocket Stove hot tub special ain’t just that it can warm you up on a cold night. Nah, this baby sets itself apart by not drainin’ the environment dry doin’ it. Regular hot tubs are thirsty – they chug power or need propane to keep that water warm. But this DIY darling? She operates on some science in her bones and a clever layout to finish the job with less fuss.
Why Choose to Dive into this DIY Adventure?
Sure, you could buy a pre-made hot tub and have it installed. But where’s the fun in that? Building your rocket stove hot tub is like embarking on a thrilling adventure—except the treasure at the end is relaxation, tranquility, and a sense of accomplishment.
Crafting Your Relaxation Oasis
Building your hot tub oasis is a pretty neat DIY project where you can make a spot to relax away from everyday stresses. The process blends some science and crafting skills to create a tub that’s heated uniquely – with a rocket stove, which I think is cool and it’s fun to take raw materials like cob and metal and then transform them into a custom chill-out space. Testing out your finished hot tub, easing in, and soaking up the warmth you made yourself would give a real sense of satisfaction. This project fuses physical work with the simple pleasure of steeping yourself like a tea bag letting the tension seep away. Even planning it out has an excitement to it as you envision your perfect private escape.
What’s a Rocket Stove Hot Tub?
A rocket stove hot tub isn’t your typical Jacuzzi or spa. It’s a marvel of simplicity, sustainability, and ingenuity that offers a unique way to unwind and rejuvenate. At its core, it’s a DIY hot tub system that operates on basic principles of thermodynamics and natural circulation.
The Components:
- The Tub: It begins with a standard tub, usually made of durable materials like wood, plastic, or fiberglass, serving as the vessel to hold the water. The size can vary based on personal preference, accommodating anything from a cozy couple’s soak to a family-friendly setup.
- The Rocket Stove: Central to this setup is the rocket stove, a compact, highly efficient wood-burning stove designed to heat water rapidly. It utilizes a combustion chamber and a vertical chimney, ensuring efficient burning and minimal smoke.
- The Water Circulation System: Unlike conventional hot tubs that rely on electric heaters or gas-powered systems, a rocket stove hot tub employs a clever water circulation system. Cold water is drawn from the tub into the stove, where it’s heated and then naturally circulates back into the tub, creating a continuous flow.
How it Works:
The magic lies in the rocket stove’s design. As the fire burns in the combustion chamber, it generates intense heat, which, combined with the insulated chimney, creates a powerful draft. This draft drives the heat upwards, transferring it to the water that circulates through the stove’s coil or jacket.
Sustainability and Simplicity:
The beauty of the rocket stove hot tub is how it works by just using basic science – no electricity or gas needed. It takes a little bit of burning wood and uses the heat that makes it warm up a big tub of water. So it gets the job done without all the usual environmental costs. I mean, the design is so simple but clever and the fire heats an insulated chamber that the water flows around. So that small fire gets the water piping hot, all thanks to the laws of thermodynamics. No fancy tech or anything. It’s eco-friendly since it just uses wood, but also elegant in its simplicity. The water gets hot because hot air rises and heat transfers – just good old-fashioned physics! Nothing too crazy but still enough to make a nice hot soak.
DIY Appeal:
Building your own rocket stove hot tub lets you get your hands dirty and make something unique. Fans like taking a practical thing and making it their own through skill and imagination and it’s not just about soaking in hot water – it shows you can use what you have around to make something sustainable that feels good too. Sure you can buy a regular hot tub, but where’s the fun and sense of accomplishment in that? When you construct the stove, jerry-rig up some pipes, and make a place to relax using your wits you feel darn proud. It’s your special, environmentally-smart chilling out zone that you crafted yourself out of enthusiasm and the desire to create. That adds an extra delightful dimension that you just can’t get from grabbing something off the shelf.
Why Choose a Rocket Stove Hot Tub?
Picture this: a traditional hot tub, steam rising into the air, bubbles fizzing, and a hefty energy bill looming in the background. Now, contrast that with a rocket stove hot tub—a marvel of simplicity, sustainability, and DIY charm.
Sustainability at Its Core:
The main draw of this idea is that it’s sustainable. Regular hot tubs use up tons of electricity or gas to keep heating the water. But a rocket stove hot tub runs on barely any energy. It’s designed real cleverly to use natural hot water currents so it doesn’t need pumps or other power sources wasting energy and this lets you relax in a nice hot bath without damaging the environment by releasing a massive amount of carbon. It’s a green way to enjoy a luxury soak without harming Mother Earth.
Cost-Effectiveness and DIY Thrill:
Building your own rocket stove hot tub lets you relax while being environmentally responsible and saving money. Store-bought hot tubs cost a chunk upfront and keep costing over time. Making my own with some elbow grease seems way more reasonable. I can scrounge up materials and create a backyard oasis through my ingenuity. But saving cash isn’t the only perk and crafting something unique and useful from scratch brings major satisfaction. It scratches a creative itch and proves I can handle constructing something that requires both brains and brawn. Getting my hands dirty while problem-solving to build my chilling spot connects me more to the final product. The journey matches the destination when I flex my DIY spirit and work hard to relax even harder.
Minimalism and Low Maintenance:
Beyond the financial and environmental benefits, a rocket stove hot tub embodies simplicity. It’s a return to basics, stripping away the complexities and energy demands of modern technology. This simplicity translates into low maintenance. With fewer mechanical parts and reliance on natural heat sources, a well-constructed rocket stove hot tub requires minimal upkeep compared to its high-tech counterparts.
Ultimately, choosing a rocket stove hot tub isn’t just about creating a space for relaxation—it’s about embracing a lifestyle that values sustainability, creativity, and the joy of hands-on craftsmanship.
Building Your Rocket Stove Hot Tub
Materials and Tools:
| Materials Needed | Tools Required |
| High-Quality Tub | Welding Equipment |
| Steel Pipes | Cutting Tools |
| Insulated Chimney Pipe | Sealing Materials |
| Pump | Plumbing Equipment |
| Heat-Resistant Cement | Measuring Instruments |
| Fire-Brick | Safety Gear |
Step-by-Step Construction Process:
- Setting Up the Tub: Choose the perfect location, ensuring a flat, stable surface for the tub. Position the tub and secure it firmly.
- Constructing the Rocket Stove: Detail the assembly process for the stove, emphasizing safety measures and precision in design.
- Connecting the Water Circulation System: Explain the integration of pipes and the pump, ensuring a clear understanding of how the water circulates.
- Ensuring Safety Measures: Emphasize the importance of proper ventilation and fire safety protocols.
Safety and Maintenance Tips
| Safety Precautions | Maintenance Tips |
| Ventilation | Regular Cleaning |
| Fire Safety | Water Quality Checks |
| Structural Integrity | Periodic Refilling |
| Temperature Monitoring | Sanitization Procedures |
Enjoying Your Rocket Stove Hot Tub
Lighting the Fire and Heating the Water:
Describe the process of lighting the fire in the rocket stove and regulating the water temperature efficiently for an optimal experience.
Ideal Settings for Different Weather Conditions:
- Cold Weather:
- Preparation: In colder climates, insulating the tub and ensuring a well-built, efficient rocket stove becomes paramount. Use additional layers of insulating material around the tub to retain heat.
- Heating Process: Start the fire earlier than usual to allow sufficient time for the water to reach the desired temperature. Consider using a cover for the tub to minimize heat loss while heating.
- Additional Comfort: Provide towels or robes for users to keep warm when transitioning in and out of the tub. Adding natural elements like wooden benches or mats can prevent slipping on icy surfaces.
- Hot Weather:
- Shading and Ventilation: Shield the tub from direct sunlight to prevent the water from overheating. Consider setting up a shade sail or using nearby trees/buildings for natural shade. Ensure good airflow around the tub area for comfort.
- Water Temperature: Monitor the water temperature more closely in hot weather; the rocket stove might heat the water faster than anticipated. Consider partially filling the tub or adding cool water as needed to maintain a comfortable temperature.
- Rainy or Windy Conditions:
- Protection: If using the hot tub in rainy or windy weather, ensure adequate shelter or a covering to protect the fire and maintain a steady temperature in the tub.
- Fire Safety: Shield the fire from rain or wind, and always keep a fire extinguisher nearby. Check for potential hazards like wet wood or increased fire risk due to strong winds.
- Mild or Moderate Climates:
- Flexible Heating: Take advantage of milder weather by adjusting the fire intensity or heating duration for a more relaxed and leisurely soaking experience.
- Outdoor Enjoyment: In pleasant weather, consider additional outdoor comforts like string lights, comfortable seating, or a nearby fire pit for a complete outdoor relaxation setting.
- Seasonal Changes:
- Autumn Delights: Embrace the beauty of autumn by enjoying the changing colors while soaking in the hot tub. Consider adding seasonal decorations to enhance the ambiance.
- Winter Magic: If using the hot tub in winter, consider placing it strategically to enjoy snowy views while soaking in warmth.
- Adapting to Unpredictable Weather:
- Flexibility: Encourage users to check weather forecasts and plan accordingly. Have backup plans for sudden changes in weather, like portable shelters or tarps.
By offering guidance on adapting the hot tub experience to diverse weather conditions, users can maximize their enjoyment and comfort throughout the year, turning their rocket stove hot tub into a versatile and enjoyable amenity.
Creating a Relaxing Atmosphere:
Picture this: you’re nestled in your homemade hot tub, surrounded by tranquility, and basking in warmth. To elevate this experience, consider these key elements to set the perfect mood:
- Lighting:
Lighting plays a pivotal role in setting the ambiance. Opt for soft, warm lighting that complements the serene setting. Consider using:
- String Lights or Lanterns: Hang soft, ambient lights around the tub area to create a cozy glow.
- Candles or Floating Lights: Place floating candles or waterproof LED lights in the tub for a magical effect.
- Torchieres or Pathway Lights: Illuminate the surrounding area with subtle pathway lights or torchieres to enhance the atmosphere without overpowering the starry night.
- Music and Sounds:
The right soundtrack can enhance relaxation. Consider these options:
- Outdoor Speakers: Set up outdoor speakers to play soothing music or nature sounds in the background.
- Portable Bluetooth Speakers: If you prefer a more intimate setup, use portable Bluetooth speakers placed strategically around the tub.
- Seating and Comfort:
Comfort is key to enjoying a long soak. Enhance the seating area around the tub:
- Cushions and Throws: Add plush cushions and throws to nearby seating to encourage lounging and relaxation.
- Outdoor Rugs: Place outdoor rugs or mats around the tub area for added comfort and aesthetics.
- Aromatherapy:
Embrace the power of scents to enhance relaxation:
- Essential Oils: Use a few drops of essential oils like lavender, eucalyptus, or chamomile in a diffuser to create a calming aroma.
- Scented Candles: Light-scented candles with calming fragrances add another dimension to the ambiance.
- Nature’s Touch:
If your hot tub is placed in a scenic outdoor setting, leverage nature’s beauty:
- Landscaping: Surround the tub with potted plants, bushes, or flowers to create a natural and serene environment.
- Scenic Views: Position the tub to take advantage of breathtaking views if available, like a garden, mountains, or starlit skies.
Remember, the goal is to create an ambiance that melts away stress and promotes relaxation. Experiment with different elements to find what works best for you and your hot tub oasis. After all, there’s no one-size-fits-all when it comes to unwinding in your personalized slice of paradise.
FAQs About Rocket Stove Hot Tubs
- How long does it take to heat up?
The heating time for a rocket stove hot tub varies based on several factors like the size of the tub, the efficiency of the stove, and the initial water temperature. Typically, it takes anywhere from 1 to 3 hours to heat the water to a comfortable soaking temperature, leveraging the rocket stove’s impressive heat output.
- Is it safe to use?
When built and operated correctly, rocket stove hot tubs are safe to use. However, safety measures are crucial. Ensuring proper ventilation, fire safety precautions, and regular checks for structural integrity are vital to mitigate risks. Following manufacturer guidelines and local safety regulations is recommended.
- What’s the cost compared to traditional hot tubs?
Building a rocket stove hot tub can cost significantly less than purchasing a traditional hot tub. Costs primarily include materials like a high-quality tub, steel pipes, insulation, a pump, and heat-resistant cement. DIY enthusiasts often find the overall expense to be notably lower, especially when considering the savings on energy bills over time.
- Can it be used in any climate?
Rocket stove hot tubs can be used in various climates, but they do perform better in certain conditions. In colder climates, the contrast between the chilly air and the warm water becomes more pronounced and enjoyable. However, insulation and heating efficiency may affect performance in extremely cold or hot climates. Proper maintenance and insulation adjustments can enhance performance in diverse weather conditions.
- How do I ensure water quality in the hot tub?
Maintaining water quality is essential for a pleasant and safe soaking experience. Regular cleaning, using appropriate sanitization procedures, and periodic refilling are crucial. Installing filters and employing natural water treatment methods like eco-friendly chemicals or UV sterilizers can help maintain water clarity and hygiene.
- Can I customize my rocket stove hot tub?
Absolutely! One of the beauties of DIY rocket stove hot tubs is the flexibility for customization. You can personalize the design, add features like seating or jets, or experiment with different materials to suit your preferences and style. Just ensure that any modifications align with safety standards and don’t compromise the structural integrity or functionality of the setup.
- How often should I perform maintenance on the rocket stove?
Regular maintenance ensures the stove operates efficiently and safely. Cleaning out ash and debris, checking for cracks, and inspecting seals should be done periodically. Seasonal maintenance, especially before heavy use, can help identify and address any potential issues early on.
Conclusion
In an age when folks fork over big money and hurt the planet for a little R&R, the rocket stove hot tub sparkles like a beacon demonstrating human innovation can pair luxury with sustainability affordably. This project gifts more than a budget-friendly, eco-conscious soak—it represents reclaiming comfort through resourcefulness and good old fashioned elbow grease. See, gathering parts like steel pipes a tub, and firebricks to construct your slice of paradise goes beyond assembly. It symbolizes stress fading as steam rises while you create a sanctuary with your own two hands. And we haven’t even gotten to the best part yet—using your hand-crafted haven! Envision yourself surrounded by friends, or maybe indulge in some solo time, letting your worries wash away in warmth and community. The crackling fire the churning water, the glittering stars overhead—these moments elevate a simple tub into an unforgettable experience but this adventure teaches more than creating a hot tub under the open skies. and It embodies the power behind human creativity, eco-conscious choices, and how raw materials fuse into something invaluable when crafted with care by an inspired mind. So when feelings of uncertainty creep up as you consider starting this rocket stove spa journey remember the destination pales compared to the expedition itself. The lessons learned, obstacles conquered, and moments cherished make the extra effort well worth it.
Crafting Your Own Plastic Barrel Pontoon Boat: A DIY Guide
Navigating DIY Waters: Creating a Pontoon Boat
There’s a captivating magnetism to open waters, an alluring tranquility beckoning us toward promises of adventure. Envision yourself at the helm of your very own boat, coasting across shimmering lakes or gentle streams, reveling in the warm kiss of sunlight. Now consider attaining such peaceful respite aboard a vessel crafted by your own hands. Constructing your personal pontoon boat may seem an ambitious endeavor initially, but take heart! In this guide, we’ll unravel the mysteries behind building a sturdy, reliable pontoon boat using one of Earth’s most adaptable materials: plastic barrels. Yes, those ubiquitous discarded containers can now form the foundation of your aquatic escape, and embarking on DIY projects often sparks a fusion of zeal and hesitance. However, equipped with a plan, essential tools, and creative verve you’ll soon find yourself navigating placid waters aboard a ship born of your artistry. This guide intends to unravel construction mysteries, making the process accessible to seasoned DIYers and curious newcomers alike. By the end, you’ll possess the knowledge and confidence to embark on this rewarding endeavor, transforming your vision of owning a customized pontoon boat into tangible actuality.
Materials and Tools
Before you begin constructing your plastic barrel pontoon boat, it’s essential to gather all the necessary materials and tools to ensure a smooth building process.
Materials
Plastic Barrels: These serve as the primary flotation devices for your pontoon boat. Aim for 6 to 8 barrels, depending on the size and weight capacity you desire. Ensure they are clean, airtight, and in good condition. Reusing barrels, such as those used for shipping or storing liquids, is a sustainable choice.
Lumber (Pressure-Treated): Select high-quality pressure-treated lumber suitable for outdoor use. The quantity will vary based on your boat’s design and size. Choose sturdy, weather-resistant wood to form the boat’s frame.
Deck Screws: Acquire a sufficient quantity of deck screws, preferably stainless steel, to secure the wooden components firmly in place. Opt for corrosion-resistant screws to ensure durability.
Plywood: The plywood serves as the deck of your pontoon boat. Purchase enough plywood to cover the boat’s frame adequately. Marine-grade plywood is recommended for its water-resistant properties.
Brackets/Straps: You’ll need sturdy brackets or heavy-duty straps to secure the plastic barrels to the wooden frame effectively. Ensure these fastening materials are durable and resistant to water and rust.
Sealant/Paint: Invest in a suitable sealant or marine-grade paint to protect the wood from water damage. Apply multiple coats for maximum protection against the elements.
Tools
Saw: A quality saw, such as a circular saw or handsaw, is necessary for cutting lumber and plywood to the required dimensions. Ensure your saw is sharp and well-maintained for precise cuts.
Drill: A power drill with assorted drill bits is essential for making holes, attaching screws, and securing the boat’s components. Consider having spare batteries or a power source nearby for uninterrupted work.
Measuring Tape: Accurate measurements are crucial for precise construction. Have a reliable measuring tape or ruler on hand to ensure each component fits perfectly.
Screwdriver: Both manual and electric screwdrivers will be necessary for driving deck screws into the wood. Ensure you have the appropriate screwdriver heads for the screws you’re using.
Sawhorses/Workbench: A stable work surface is essential for assembling and working on the boat’s components. Sawhorses or a sturdy workbench will provide the necessary support.
Sandpaper: Smooth out rough edges on the wood and plywood using sandpaper. This ensures a finished look and reduces the risk of splinters while handling the boat.
Before diving into construction, gather the necessary materials and tools for this project. Here’s what you’ll need:
| Materials | Quantity | Tools |
| Plastic barrels | 6-8 (depending) | Saw |
| Lumber (pressure-treated) | As per design | Drill |
| Deck screws | Sufficient amount | Measuring tape |
| Plywood | As per design | Screwdriver |
| Brackets/Straps | Sufficient amount | Sawhorses/workbench |
| Sealant/paint | As needed | Sandpaper |
Sketching Your Design
Start by visualizing the boat you want. Grab a piece of paper or a digital drawing tool and sketch out the boat’s shape, size, and layout. Consider factors like the number of people it should accommodate, the intended use (fishing, leisure, etc.), and any additional features like seating arrangements or storage compartments.
Size and Weight Considerations
The size of your boat will largely depend on your intended use and the available space for construction. Calculate the approximate weight capacity needed based on the number of people or cargo you plan to carry. Remember, the more barrels you use, the higher the buoyancy and weight capacity.
Selecting the Right Barrels
The choice of plastic barrels is critical. Ensure they are in good condition, without any cracks or significant damage. Check their buoyancy capacity and confirm they are airtight before integrating them into your design. The number of barrels will depend on the size and weight requirements of your boat.
Structural Integrity and Stability
Consider the structural integrity of the boat. A strong, stable frame is essential for safety on the water. Plan the frame’s layout and construction carefully, keeping in mind the weight distribution of the barrels and the deck. Distribute the weight evenly to ensure balance and stability when the boat is afloat.
Adapting the Design
Flexibility is key. During this planning phase, be open to making adjustments to your initial design. Consider feedback from experienced boat builders or enthusiasts and adapt your design accordingly. Sometimes, minor tweaks can significantly enhance the boat’s performance and functionality.
Budget and Resources
Factor in the budget for your project. While using plastic barrels makes this a cost-effective venture compared to traditional pontoon boat construction, it’s wise to account for all expenses, including materials, tools, and any unforeseen costs that may arise during the build.
By meticulously planning and designing your plastic barrel pontoon boat, you lay a solid foundation for a successful construction phase. The more thought and detail you put into this stage, the smoother the execution will be, leading to a finished product that aligns with your vision.
Preparing the Barrels
Your plastic barrels are the unsung heroes of your pontoon boat—they provide the essential buoyancy required for smooth sailing. Before integrating them into your project, it’s crucial to prepare these barrels properly to ensure safety and reliability on the water.
Step 1: Procuring the Right Barrels: Begin by sourcing high-quality plastic barrels. Opt for barrels in good condition, preferably food-grade barrels that have previously contained non-toxic materials. The quantity of barrels you’ll need depends on the size and weight capacity of your desired pontoon boat. Typically, six to eight barrels are sufficient for smaller to medium-sized boats.
Step 2: Cleaning and Inspecting: Once you have the barrels, it’s time for a thorough cleaning session. Remove any labels, stickers, or residue that might compromise the barrel’s integrity. Rinse the barrels meticulously, inside and out, using a mild detergent and water solution to ensure they’re clean and free from any contaminants.
Inspect each barrel carefully for cracks, leaks, or deformities. Even minor damages can compromise the buoyancy and safety of your pontoon boat. Ensure that the barrels are airtight and structurally sound before proceeding further.
Step 3: Securing the Barrels: With clean and inspected barrels, the next step is to securely fasten them to the wooden frame of your pontoon boat. To do this, utilize heavy-duty straps or brackets specifically designed for boat-building purposes.
Position the barrels evenly along the length of the frame, distributing the weight effectively. Use straps or brackets to tightly secure the barrels to the frame, ensuring they are firmly attached and won’t shift or dislodge during use.
Step 4: Additional Considerations: Consider applying a protective coating or sealant on the barrels’ exteriors. While plastic barrels are designed to withstand water exposure, an extra layer of protection can enhance their durability against UV rays and potential abrasions from prolonged use in water.
By properly preparing and securing the plastic barrels to your pontoon boat’s frame, you’re laying a solid foundation for a safe and reliable watercraft. This meticulous preparation ensures that your DIY project sails smoothly, quite literally, on the waters.
Building the Frame
Constructing a solid and reliable frame is the backbone of your pontoon boat. This section outlines the step-by-step process of creating a sturdy foundation to support your boat’s structure and ensure stability on the water.
- Design Considerations: Before cutting any lumber, revisit your design sketches. The frame’s dimensions and structure must align with the boat’s overall size and intended use. Calculate the required length, width, and height, ensuring it accommodates the chosen plastic barrels and deck size.
- Lumber Selection and Cutting: Choose high-quality pressure-treated lumber for durability and longevity, especially when exposed to water. Carefully measure and cut the lumber according to your design specifications. Precision is key to ensuring a snug fit and optimal support for the barrels.
- Assembling the Sides and Base: Begin by constructing the sides and base of the frame separately. Use the appropriate screws and drill to securely fasten the pieces together, ensuring that the frame is structurally sound and able to withstand the weight of the barrels and deck.
- Attaching the Barrels: With the sides and base in place, it’s time to position and attach the plastic barrels. Ensure an even distribution along the frame’s length to maintain balance on the water. Fasten the barrels securely using heavy-duty straps or brackets, preventing any movement or instability.
- Reinforcement and Stability: To reinforce the frame and enhance stability, consider adding additional support beams or crossbars. This step strengthens the structure, especially if you plan to use the pontoon boat for heavier loads or extended periods.
- Inspection and Adjustments: Once the frame is assembled, conduct a thorough inspection. Check for any loose fittings, uneven weight distribution, or potential weak points. Make necessary adjustments to ensure the frame’s integrity before proceeding to the next construction phase.
- Safety Precautions: During the assembly process, prioritize safety. Wear appropriate protective gear, such as gloves and goggles, when handling tools and materials. Additionally, work in a well-ventilated area to minimize exposure to sawdust and sealant fumes.
- Time and Patience: Building the frame requires attention to detail and patience. Take your time with measurements and assembly to ensure precision and accuracy. Rushing through this step can compromise the boat’s structural integrity and safety on the water.
Installing the Deck
Creating the Deck
Creating the deck for your plastic barrel pontoon boat is a critical step that ensures stability and durability on the water. Here’s a detailed guide on how to go about this crucial part of the construction process:
Once the wooden frame is ready and the barrels are securely attached, it’s time to create the deck. Follow these steps for a reliable and sturdy deck:
- Measure and Cut the Plywood: Take precise measurements of the frame’s top surface. Use these measurements to cut the plywood sheets to fit the frame perfectly. A jigsaw or circular saw works well for cutting plywood.
- Deck Attachment: Place the plywood sheets onto the frame. Ensure they align properly and cover the entire top surface. Secure the plywood to the frame using deck screws. Position the screws evenly across the plywood, ensuring they’re driven securely into the wooden frame below.
- Reinforcement and Support: To enhance the deck’s strength, consider adding additional support beams underneath. These beams can be attached perpendicular to the main frame, providing extra reinforcement and preventing any sagging in the plywood.
- Sealant or Paint Application: Protect your deck against water damage by applying a suitable sealant or paint. This step not only safeguards the wood but also adds an aesthetic touch to your pontoon boat. Ensure you use a marine-grade sealant or paint designed specifically for water exposure.
- Finishing Touches: After the sealant or paint has dried, sand the edges of the plywood to smooth out any roughness. This step adds a polished look and reduces the risk of splinters.
- Non-Slip Surface (Optional): For added safety, consider applying a non-slip coating to the deck surface. This coating provides better traction, especially when the deck gets wet, reducing the risk of slipping.
Tips for Deck Construction
- Quality Materials: Use high-quality plywood resistant to water damage and warping.
- Proper Sealing: Apply the sealant or paint in multiple coats, ensuring thorough coverage to protect the wood from moisture.
- Regular Maintenance: Inspect the deck regularly for any signs of wear or damage. Promptly repair any cracks or scratches and reapply sealant when necessary to maintain its integrity.
By following these steps, you’ll have a robust and reliable deck for your plastic barrel pontoon boat. Remember, a well-built deck not only ensures safety but also contributes to the overall longevity of your homemade watercraft.
Safety Measures and Testing
Safety should always be a top priority when it comes to any watercraft. Here’s a detailed look at the safety measures to consider and the testing process for your homemade pontoon boat:
Ensuring Safety Measures:
- Life Jackets and Safety Equipment: Before even setting foot on your pontoon boat, equip yourself and your passengers with properly fitting life jackets. Ensure you have essential safety equipment like a throwable flotation device, a first aid kit, a whistle, and a fire extinguisher, especially if you plan extended trips or fishing outings.
- Boating Regulations and Knowledge: Familiarize yourself with local boating regulations and guidelines. Understanding rules about speed limits, right-of-way, and other navigational rules will enhance your safety and enjoyment on the water.
- Stability and Weight Distribution: Double-check the stability of your boat by evenly distributing weight across the deck. Ensure that the barrels are securely fastened and that any added weight, like furniture or equipment, doesn’t compromise the boat’s balance.
Conducting Testing:
- Initial Stability Check: Before taking your boat out on the water, perform a stability check in a controlled environment. Place the boat in shallow water and gradually distribute weight to ensure it floats evenly and doesn’t list to one side.
- Buoyancy Test: This test involves loading the boat to its intended capacity to check for buoyancy and stability. Gradually add weight, monitoring how the boat reacts and ensuring it remains afloat without strain.
- Water Testing: Take your boat for a test run in shallow waters, observing how it handles movement, stability, and any signs of water seepage or instability. This initial test will provide insights into adjustments that might be necessary before taking it into deeper waters.
- Emergency Drills: Consider simulating emergency scenarios, like a man-overboard drill, to ensure everyone on board knows what to do in case of an unexpected event.
Ongoing Safety Practices:
- Regular Maintenance Checks: Periodically inspect your boat for any signs of wear, loose fastenings, or damage. Replace or repair any components as needed to maintain optimal safety.
- Weather Awareness: Stay updated on weather forecasts before heading out on your pontoon boat. Sudden changes in weather conditions can pose risks, so always prioritize safety when planning your outings.
By adhering to these safety measures and conducting thorough testing, you’ll not only ensure the safety of yourself and your passengers but also enhance the overall experience of cruising on your homemade plastic barrel pontoon boat.
Maintenance and Upkeep
Congratulations on building your plastic barrel pontoon boat! Now, to ensure its longevity and optimal performance, regular maintenance is crucial.
- Routine Inspections: Schedule regular checks for any signs of wear and tear. Inspect the barrels for cracks, the wooden frame for rot or weakening, and the deck for water damage or warping. Catching issues early prevents further damage and keeps your boat safe on the water.
- Cleaning Routine: After each use, give your pontoon boat a thorough clean. Use mild soap and water to remove dirt, debris, and salt if used in saltwater. Rinse the barrels and deck properly to prevent buildup that might compromise the boat’s integrity.
- Repairing Minor Damage: Small damages are inevitable with regular use. Have a repair kit handy with extra screws, sealant, and wood filler. Fix minor scratches, loose screws, or small leaks promptly to prevent them from becoming larger issues.
- Protective Coating Maintenance: If you’ve applied a sealant or paint for protection, monitor its condition. Touch up any areas where the coating has worn off to maintain the boat’s resistance to water damage and weathering.
- Winterization Process: If you live in an area with cold winters, consider winterizing your boat. Remove any electronics or valuables, drain water from the barrels, and store the boat in a sheltered area. Protect it from snow, ice, and extreme temperature fluctuations.
- Proper Storage: When not in use, store your pontoon boat in a dry and secure location. Keep it away from direct sunlight and harsh weather conditions that might degrade the materials over time.
- Seek Professional Help if Needed: For major repairs or structural issues, don’t hesitate to seek professional assistance. They can provide expert advice and ensure that your boat remains safe and seaworthy.
Remember, consistent maintenance not only prolongs the life of your pontoon boat but also ensures your safety while enjoying your time on the water. By investing a little effort into upkeep, you’ll continue to enjoy your homemade watercraft for years to come.
Benefits and Cost-Effectiveness
Owning a homemade plastic barrel pontoon boat offers a plethora of benefits beyond just the sheer joy of building it yourself.
- Affordability: Traditional pontoon boats can be expensive, but by utilizing recycled plastic barrels and readily available lumber, you significantly cut costs. The materials required for this DIY project are relatively inexpensive compared to purchasing a pre-built boat.
- Environmental Consciousness: Repurposing plastic barrels for a pontoon boat contributes to reducing waste. By upcycling materials that would otherwise end up in landfills or water bodies, you’re engaging in eco-friendly practices. It’s a small but meaningful step towards sustainability.
- Customization and Personalization: Building your pontoon boat allows for customization according to your preferences. From choosing the boat’s size and design to the color of the deck, every aspect can reflect your style and needs. This customization aspect is often limited in store-bought boats.
- Learning and Skill Development: Undertaking a DIY project like this is a learning experience. It provides an opportunity to develop practical skills in woodworking, design, and boat construction. It’s a rewarding journey that enhances your knowledge and capabilities.
- Recreational and Leisure Value: Beyond the construction process, the ultimate reward lies in the enjoyment of your creation. Whether it’s for fishing adventures, family outings, or simply relaxing on the water, your homemade pontoon boat promises countless hours of leisure and recreation.
- Long-Term Cost Savings: Aside from the initial cost savings, homemade pontoon boats often require less maintenance compared to expensive, professionally built vessels. Proper care and maintenance can prolong its lifespan, offering long-term cost savings in upkeep and repairs.
- Sense of Accomplishment: Completing a project of this magnitude instills a sense of accomplishment. The pride and satisfaction derived from crafting a functional watercraft with your own hands are unparalleled. It’s an achievement worth celebrating.
Sailing Into Memories: The Fulfillment and Evolution of Your DIY Plastic Barrel Pontoon Boat
Building your plastic barrel pontoon boat isn’t just about making a boat. It’s about making memories and feeling proud that you built something awesome yourself. When you’re cruising on the water in your homemade pontoon, hearing the water splash on the sides will remind you of all the hard work, passion, and time you put into making it. This isn’t just some floaty thing; it shows how creative and resourceful you are. Beyond having a useful pontoon boat, there’s also the pure happiness of seeing your project come to reality. The gentle rocking as you drift along laughs from friends onboard, and quiet moments surrounded by nature – that’s priceless, and, you’re not done when it’s built. Your pontoon keeps evolving, like a canvas for you to add personal touches make changes, and tweak things. Each modification shows your experiences and preferences, so the boat evolves as you do. Finally, building it yourself means using reused materials and less waste which is good for the planet. Your pontoon isn’t just fun; it shows responsibility and care for the environment. So grab this chance to make your dreams real. You started with an idea, but you’ll finish with a dream come true – smoothly sailing your creation.
Embracing Minimalist Living: Practical Ideas for a Tiny Home Lifestyle
Transformative Insights for Crafting Intentional, Efficient Spaces
In a world often overwhelmed by surplus and disorder, the appeal of minimalist living has gained momentum. It’s a philosophy that goes beyond mere tidying; it’s about deliberately curating a life that’s both intentional and liberating. Now, envision this philosophy flourishing within the compact walls of a tiny home—an embodiment of simplicity, efficiency, and contemplative living. Minimalist living isn’t just about decluttering physical spaces; it’s an intentional choice to prioritize what truly matters. It’s the art of letting go of the unessential to make room for the essential—a concept that finds a natural home in the intimate spaces of tiny houses. Within the cozy confines of these small dwellings, the principles of minimalism take on a transformative power and it’s not about sacrificing comfort but rather optimizing space and functionality. Every nook and cranny in a tiny home has the potential to be an expression of purpose and utility. In this comprehensive guide, will explore the landscape of minimalist living tailored specifically for enthusiasts of the tiny home lifestyle. From decluttering techniques to ingenious space-saving solutions, we’ll dive into how to infuse simplicity and functionality into the heart of your home. But beyond the practical tips, we’ll delve into the ethos of minimalism, uncovering its profound impact on daily life within these compact yet inspiring living spaces.
The Essence of Minimalist Living
Minimalism isn’t just about discarding possessions; it’s a deliberate choice to strip away the unnecessary, focusing on what truly adds value and meaning to life. At its core, it’s a lifestyle shift that encourages conscious consumption, intentional living, and a profound reevaluation of priorities.
Understanding the Philosophy Behind Minimalism
Minimalism extends beyond the physical realm; it’s a mindset that challenges the conventional notion of accumulation and materialism. By consciously reducing possessions, individuals declutter not just their spaces but also their minds. It’s an invitation to reexamine the relationship between belongings and happiness, emphasizing experiences and relationships over material wealth.
Within the compact walls of a tiny home, the essence of minimalism amplifies its impact. Every item serves a purpose, fulfilling a specific need or bringing genuine joy. Residents learn to cherish what they have, fostering a sense of gratitude and contentment.
Benefits of Adopting a Minimalist Approach in a Tiny Home
- Increased Space Utilization: Every inch of space in a tiny home is valuable. By embracing minimalist principles, residents creatively maximize space, leading to multifunctional areas that seamlessly adapt to various needs.
- Enhanced Clarity and Reduced Stress: In a clutter-free environment, the mind finds solace. Minimalism in a tiny home eliminates distractions, creating a serene atmosphere conducive to relaxation and creativity.
- Eco-Friendly Practices: The minimalist lifestyle inherently promotes sustainability. Fewer belongings often translate to reduced waste and a smaller carbon footprint, aligning perfectly with eco-conscious living.
In essence, minimalist living in a tiny home transcends the mere act of downsizing; it’s a transformative journey towards intentional, mindful living that fosters a profound appreciation for simplicity and purpose.
Practical Tips for Embracing Minimalist Living in Tiny Homes
Living in a tiny home demands a deliberate approach to space utilization and conscious decision-making about possessions. Implementing minimalist principles in this unique setting requires innovative strategies and a mindful mindset.
Decluttering Techniques
Decluttering serves as the cornerstone of minimalist living in a tiny home, fostering an environment of simplicity and functionality.
- Marie Kondo’s Method: Marie Kondo’s approach involves assessing each possession’s value based on whether it sparks joy. Hold each item, evaluate its significance, and keep only those items that resonate deeply with you. This method not only declutters but also creates a curated environment filled with items that hold emotional or functional value.
- One In, One Out Rule: Adopting this rule prevents the accumulation of unnecessary items. Every time a new item is introduced into your home, ensure an equivalent item leaves. It maintains balance and prevents spaces from becoming cluttered.
Multi-Purpose Furniture and Space-Saving Solutions
In tiny homes, furniture must serve multiple functions while maximizing the available space.
- Foldable Furniture: Investing in foldable or collapsible furniture such as tables, chairs, or beds allows for flexible usage. These pieces can be tucked away when not in use, creating space for various activities.
- Vertical Storage Ideas: Utilizing vertical space efficiently is crucial. Wall-mounted shelves, hanging organizers, or built-in cabinets help maximize storage without encroaching on valuable floor space.
Simplifying Daily Routines
Streamlining day-to-day activities is essential in maintaining a minimalist lifestyle in a tiny home.
- Capsule Wardrobes: Curate a small collection of clothing items that are versatile and mix-and-match. This minimizes the need for excessive clothing while maximizing wardrobe functionality.
- Streamlined Kitchen Essentials: Pare down kitchenware to the essentials. Opt for multipurpose utensils and compact appliances to optimize kitchen functionality without cluttering countertops or cabinets.
By integrating these practical tips into the daily rhythm of tiny home living, individuals can create a space that not only maximizes functionality but also exudes the essence of minimalist living—simplicity, purpose, and tranquility.
Personalizing Your Tiny Home with Minimalist Style
Minimalist style isn’t synonymous with sterile spaces; it’s about creating a serene environment that reflects your personality while embracing simplicity.
Creating an Aesthetic Harmony
Choosing a neutral color palette serves as a canvas for personal expression. While whites and grays evoke a sense of calmness, infusing pops of color through accents like cushions or artwork adds personality without overwhelming the space.
Incorporating natural elements is key to a minimalist aesthetic. Wood accents or stone surfaces not only lend a touch of elegance but also foster a connection to nature, grounding the space in warmth and authenticity.
Maximizing Natural Light and Open Spaces
Ample natural light is a cornerstone of minimalist design. Installing larger windows or adding skylights not only brightens the interior but also amplifies the feeling of openness, making the space appear more expansive.
Opting for an open floor plan eliminates barriers, allowing seamless movement and visual continuity. A clutter-free environment fosters a sense of freedom and airiness, enhancing the minimalist vibe.
Functional Minimalism in Furniture and Décor
Choose furniture with clean lines and multifunctional aspects. Pieces that serve multiple purposes, such as a storage ottoman or a sofa that converts into a bed, maximize utility without sacrificing aesthetics.
Incorporating minimalist decor involves intentional selection. Opt for statement pieces that complement the space rather than overcrowding it. A single striking piece of art or a carefully chosen plant can become a focal point, adding character to the room.
While minimalist living encourages simplicity, it doesn’t mean devoid of personal touches. Select a few meaningful items or family heirlooms that hold sentimental value and integrate them into your decor mindfully. These cherished items add depth and a personal narrative to your space.
By curating a minimalist style in your tiny home, you’re not just decorating; you’re crafting an environment that reflects your taste, values, and aspirations, all while promoting a sense of serenity and purposeful living.
Overcoming Challenges and Sustaining the Minimalist Lifestyle
Living in a tiny home and adopting a minimalist lifestyle presents unique challenges that often require a mindful and adaptive approach.
Dealing with Sentimental Items
Sentimental attachments to certain items can pose a significant challenge in embracing minimalism. These items carry emotional weight, making it difficult to let go. However, a shift in perspective can help. Rather than keeping physical mementos, consider capturing memories through photographs, digital archives, or journaling. This way, you preserve the essence of the memory while reducing the physical clutter in your space.
Staying Committed to Simple Living Principles
Maintaining a minimalist lifestyle necessitates ongoing dedication and a conscious evaluation of our consumption habits. Practicing mindful consumption involves regularly questioning our purchases. Before acquiring something new, consider its necessity and whether it truly aligns with your values and needs. Adhering to the “one in, one out” rule can assist in maintaining a balanced inventory of possessions. Periodic assessments of your possessions and living space ensure they remain in line with your minimalist objectives.
Handling Social Pressures and Consumer Culture
Resisting societal pressures that glorify consumerism can be challenging. The pervasive culture of always wanting more can make sticking to a minimalist lifestyle seem unconventional. However, embracing minimalism empowers individuals to break free from the cycle of consumption and redefine success beyond material possessions. It’s about cherishing experiences, fostering meaningful connections, and prioritizing personal growth over material accumulation.
Moreover, the supportive community of fellow minimalists and tiny home enthusiasts can provide invaluable encouragement and practical advice in navigating these challenges. Engaging with like-minded individuals, whether through online forums, local groups, or workshops, can reinforce your commitment to minimalist living and offer inspiration for sustaining this lifestyle.
Successfully sustaining a minimalist lifestyle in a tiny home involves not only addressing these challenges but also cultivating a mindset that values intentionality, mindfulness, and the pursuit of a simpler, more fulfilling life.
Embracing Minimalist Living: Finding Peace and Purpose in Your Tiny Home Oasis
Living with less in a tiny house is about more than just downsizing or decluttering. It’s really about rethinking what’s important and living more intentionally. As we’ve gone through this guide, we’ve looked at how to apply minimalist ideas to small spaces and sure, there’s practical stuff like getting rid of excess stuff, using space well, and making it look nice. But it’s not just about that. It’s also about creating a place that supports your values and feels peaceful. A place where you can just be and enjoy life more. This isn’t a race to some perfect minimalist tiny house. It’s more like an ongoing journey to align your life and space with what matters most. As you gradually shift in that direction, you’ll likely find more freedom and fulfillment. So take your time with it. Enjoy the process. Savor the simplicity. And let your tiny home reflect and support the life you aspire to – one with more clarity, tranquility, and joy. Where less can mean more in terms of what enriches your life. I wish you the best on your journey toward intentional living in your tiny home oasis!
